Overview
This document provides detailed instructions on how to record spatial video – the first step in the Xense AR spatial computing platform workflow.
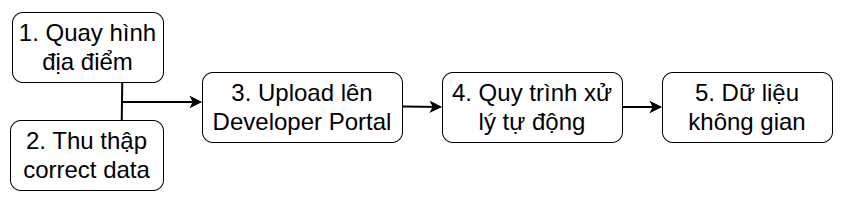
Users will record videos at the location to be digitized and then upload them to the system. The data will be processed to generate a Spatial Map (Spatial Data), which serves as the foundation for AR experiences, VPS positioning, and spatial interactions.
Workflow Diagram
Spatial Video Recording Options
| Recording Device | Use Case | Output | |
|---|---|---|---|
| Option 1 | Smartphone | Used for small spaces, area less than 1000m² | 1. Multiple spatial videos - Recorded using the phone’s standard camera 2. One Correct Data set: - Recorded using the XenseAR ToolBox app in Calibration mode - Includes two files: .mp4 and .json |
| Option 2 | 360 Camera | Used for large spaces, area greater than 1000m² | 1. Continuous video recorded with a 360 camera: - One seamless video file, or multiple smaller files automatically segmented by the device. 2. One Trajectory Data set: - Recorded simultaneously while filming with the 360 camera using the XenseAR ToolBox app in Trajectory mode - Includes one file: .json 3. One Correct Data set: - Duration: 30–60 seconds - Recorded using the XenseAR ToolBox app in Calibration mode - Includes two files: .mp4 and .json |
Notes:
- Spatial video recording and correct data recording are two separate steps. Correct data must be recorded after completing spatial video recording.
- Trajectory data is recorded only when using a 360 camera and must be captured continuously and simultaneously during the 360 video recording process.
Last updated on