7. Package Management
The Credentials feature allows users to view and manage VPS Packages created for each Project.
7.1. Viewing and Managing Credential Packages
Step 1 – Access VPS Package
Navigate to the Credentials menu.
Step 2 – Open the VPS Package List
Select the VPS Package tab.
The system displays a list of Packages with the following information:
- Package Name: The name of the Package.
- Project: The Project to which the Package is applied.
- Type: The Package type, including Free Trial or Paid Service.
- QPS: The maximum number of queries allowed per second.
- Date Created: The date and time when the Package was created.
- Status: The current status of the Package.
The main statuses include:
- Active: The Package is active and available for use.
- Awaiting Payment: The Paid Service Package has been created and is awaiting completion of the payment/service confirmation process.
- Expired: The Package has expired and is no longer available for use.
Step 3 – Open the Action Menu
Select the ⋮ icon at the end of the Package row to open the action menu.
Depending on the Package type and status, the system may provide the following functions:
- Pay now
- Edit
- Delete
- Upgrade (for eligible Free Trial Packages)
7.2. Paying for a Paid Service Package
The Pay now function is available for Paid Service Packages with the Awaiting Payment status.
Process Flow
Awaiting Payment → Pay now → Contact Us → Payment/Service Confirmation → Active
Steps
Step 1 – Access VPS Package
Navigate to:
Credentials → VPS Package
Step 2 – Find the Paid Service Package
Find the Paid Service Package with the status:
Awaiting Payment
Step 3 – Select Pay now
Select ⋮ → Pay now.
Step 4 – Contact the Service Provider
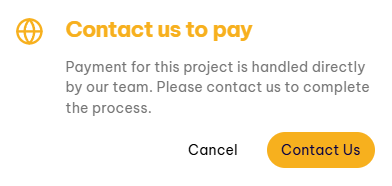
The system displays the Contact us to pay dialog, indicating that payment will be handled directly by the service provider’s team.
The user has two options:
- Cancel: Cancel the operation and return to the Package list.
- Contact Us: Contact the service provider to continue the payment process.
Step 5 – Complete Payment
Select Contact Us and complete the payment/service confirmation procedures according to the service provider’s instructions.
Step 6 – Activate the Package
After the payment is confirmed, the Package is activated.
The status changes from:
Awaiting Payment → Active
When the Package is Active, the user can use the service according to the allocated QPS and validity period.
7.3. Editing Package Information
The Edit function allows users to update certain Package information but does not allow changes to fixed service attributes.
Step 1 – Select Edit
In the VPS Package list, select:
⋮ → Edit
Step 2 – Update Basic Information
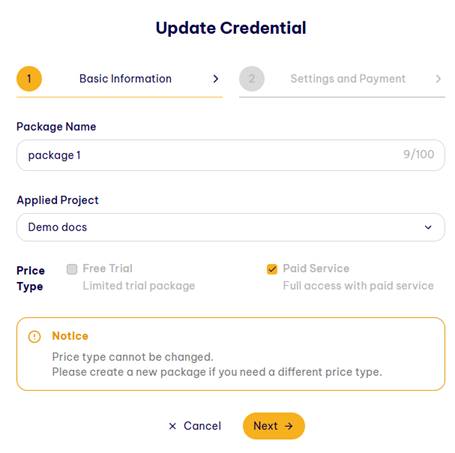
The system displays the Update Credential – Basic Information screen.
The following information can be edited:
- Package Name
- Applied Project
Update limitations:
- Price Type cannot be changed.
- Paid Service cannot be changed to Free Trial, and vice versa.
Step 3 – Check Settings and Payment
Select [Next] to proceed to Settings and Payment.
The system displays the Package parameters:
- QPS
- Service Start Date
- Service End Date
These service parameters are fixed according to the Package and cannot be changed through the Edit function.
Step 4 – Save Changes
Select [Update] to save the editable information.
7.4. Deleting a VPS Package
The Delete function allows users to remove a VPS Package from the system.
Process Flow
Select Package → Delete → Confirm Deletion → Confirm Delete → Package Deleted
Steps
Step 1 – Access VPS Package
Navigate to:
Credentials → VPS Package
Step 2 – Find the Package to Delete
Find the Package you want to delete in the list.
Step 3 – Select Delete
Select:
⋮ → Delete
Step 4 – Confirm Deletion
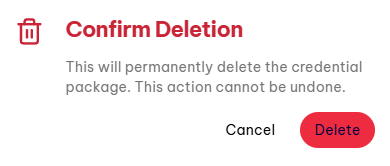
The system displays the Confirm Deletion dialog with a warning that the Package will be permanently deleted and the action cannot be undone.
The user has two options:
- Cancel: Cancel the operation and keep the Package unchanged.
- Delete: Confirm the deletion of the Package.
Step 5 – Delete the Package
Select Delete to confirm.
The Package will be removed from the system.
7.5. Upgrading from Free Trial to Paid Service
Users can directly upgrade a VPS Package from the Free Trial plan to Paid Service using the Upgrade function in the VPS Package list.
During the upgrade, users can reconfigure the following service parameters:
- QPS: The maximum number of queries per second.
- Service Start Date: The service start date.
- Service End Date: The service end date.
Process Flow
Free Trial (Active) → Upgrade → Configure QPS & Service Period → Confirm Upgrade → Awaiting Payment → Payment/Confirmation → Paid Service (Active)
Step 1 – Select the Free Trial Package to Upgrade
Navigate to:
Credentials → VPS Package
In the VPS Package list, find a Package that:
- Has Type = Free Trial.
- Is in a status eligible for upgrade, such as Active.
Select the ⋮ icon at the end of the Package row.
Step 2 – Select Upgrade
From the action menu, select Upgrade.
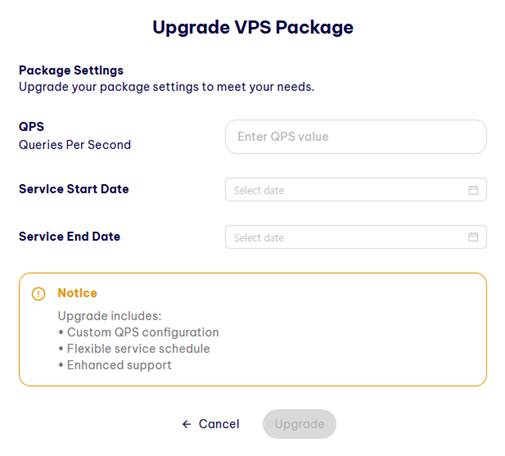
The system opens the Upgrade VPS Package dialog.
Step 3 – Configure QPS
In the QPS – Queries Per Second field, enter the desired QPS limit for the Paid Service package.
Step 4 – Select the Service Period
Configure:
- Service Start Date: The date when the Paid Service starts.
- Service End Date: The date when the service ends.
This period determines the validity period of the Paid Service.
Step 5 – Confirm the Upgrade
After all required fields have been completed, the [Upgrade] button becomes enabled.
The user can:
- Select [Upgrade] to submit the Package upgrade request.
- Select [Cancel] to close the dialog and keep the Free Trial Package unchanged.
Step 6 – Switch to Payment Pending Status
After the upgrade request is successfully created, the Package moves from Free Trial into the Paid Service process.
The Package status changes to:
Awaiting Payment
Step 7 – Pay for and Activate the Paid Service
For the Package with Awaiting Payment status, select:
⋮ → Pay now
Then complete the contact and payment process with the service provider.
After the payment and service configuration are confirmed, the Package changes to:
Active
The Package then operates under the Paid Service plan with the configured QPS and service period.