IMAGE TRACKING USER GUIDE
1. Creating an Image Tracking Experience
Step 1 – Create a New Experience
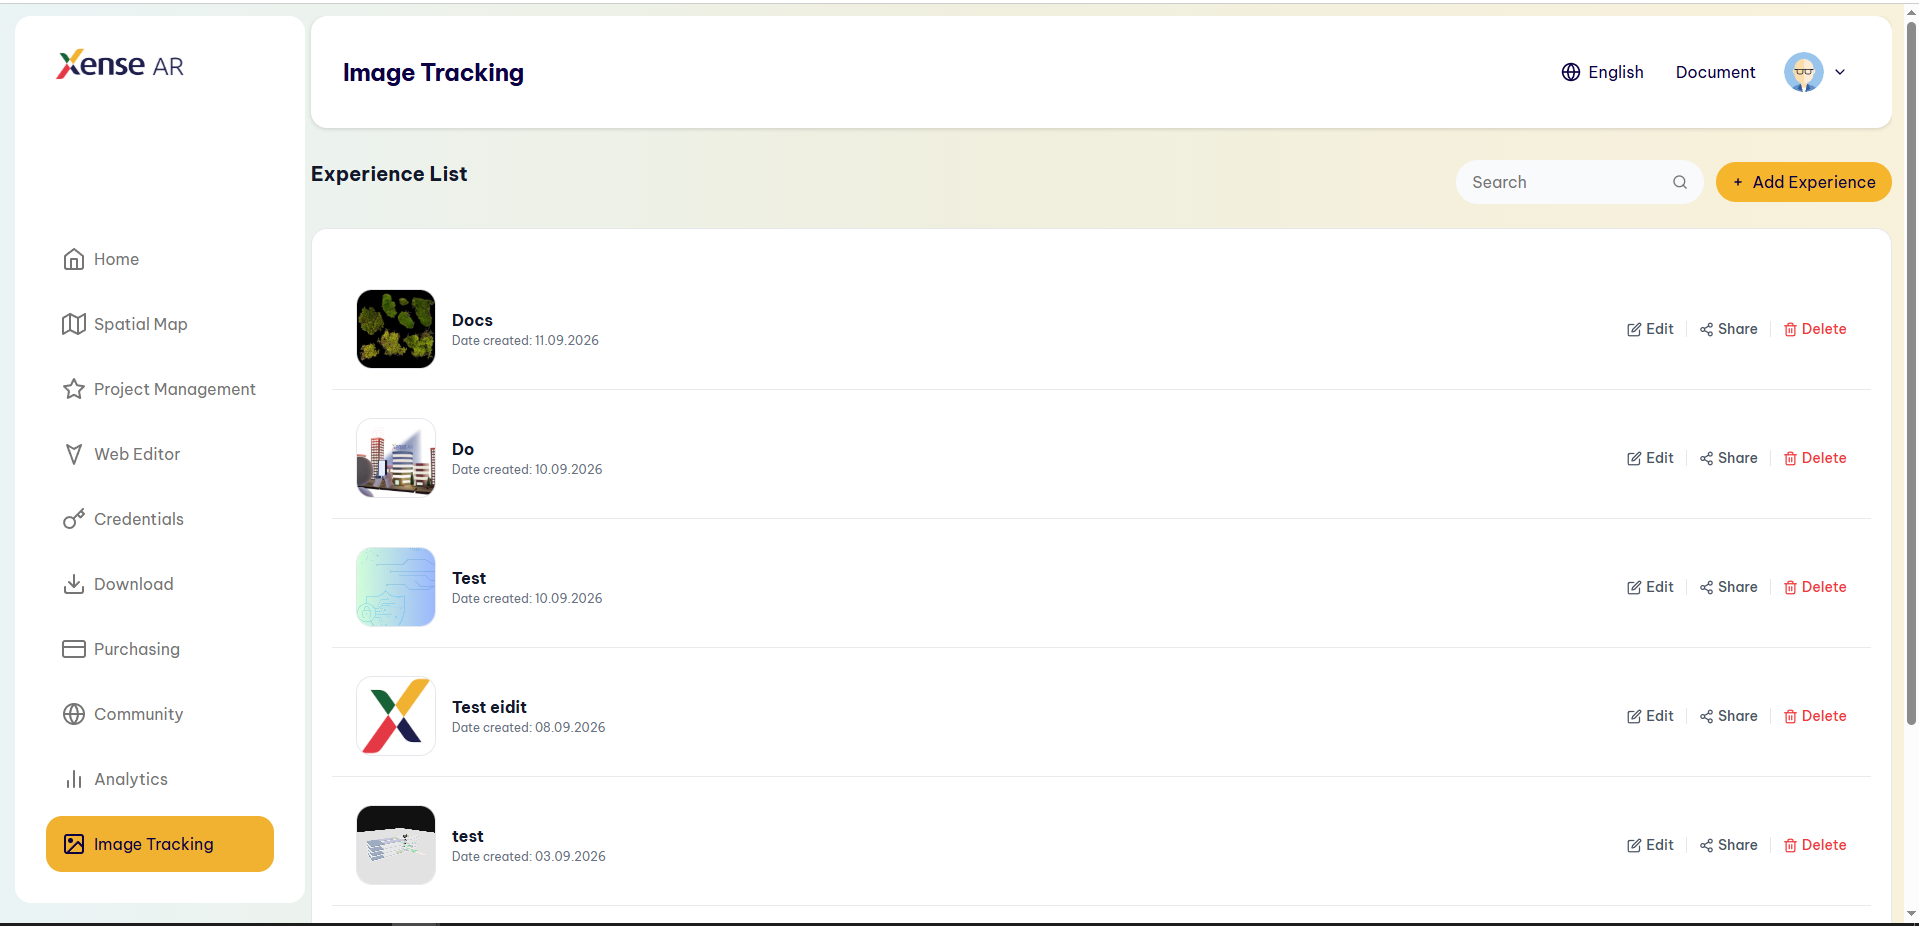
On the Experience List screen, click the [+ Add Experience] button.
The Add Image Tracking Experience dialog appears and requires the following information:
| Field | Description |
|---|---|
| Experience Name * | Name of the AR experience (e.g., My AR Experience). |
| Description * | A brief description of the experience. |
| Thumbnail Image | The thumbnail displayed in the list and on the preview screen on mobile devices. Supports .JPEG, .PNG, and .JPG formats with a file size smaller than 5 MB. Drag and drop or click to select an image. |
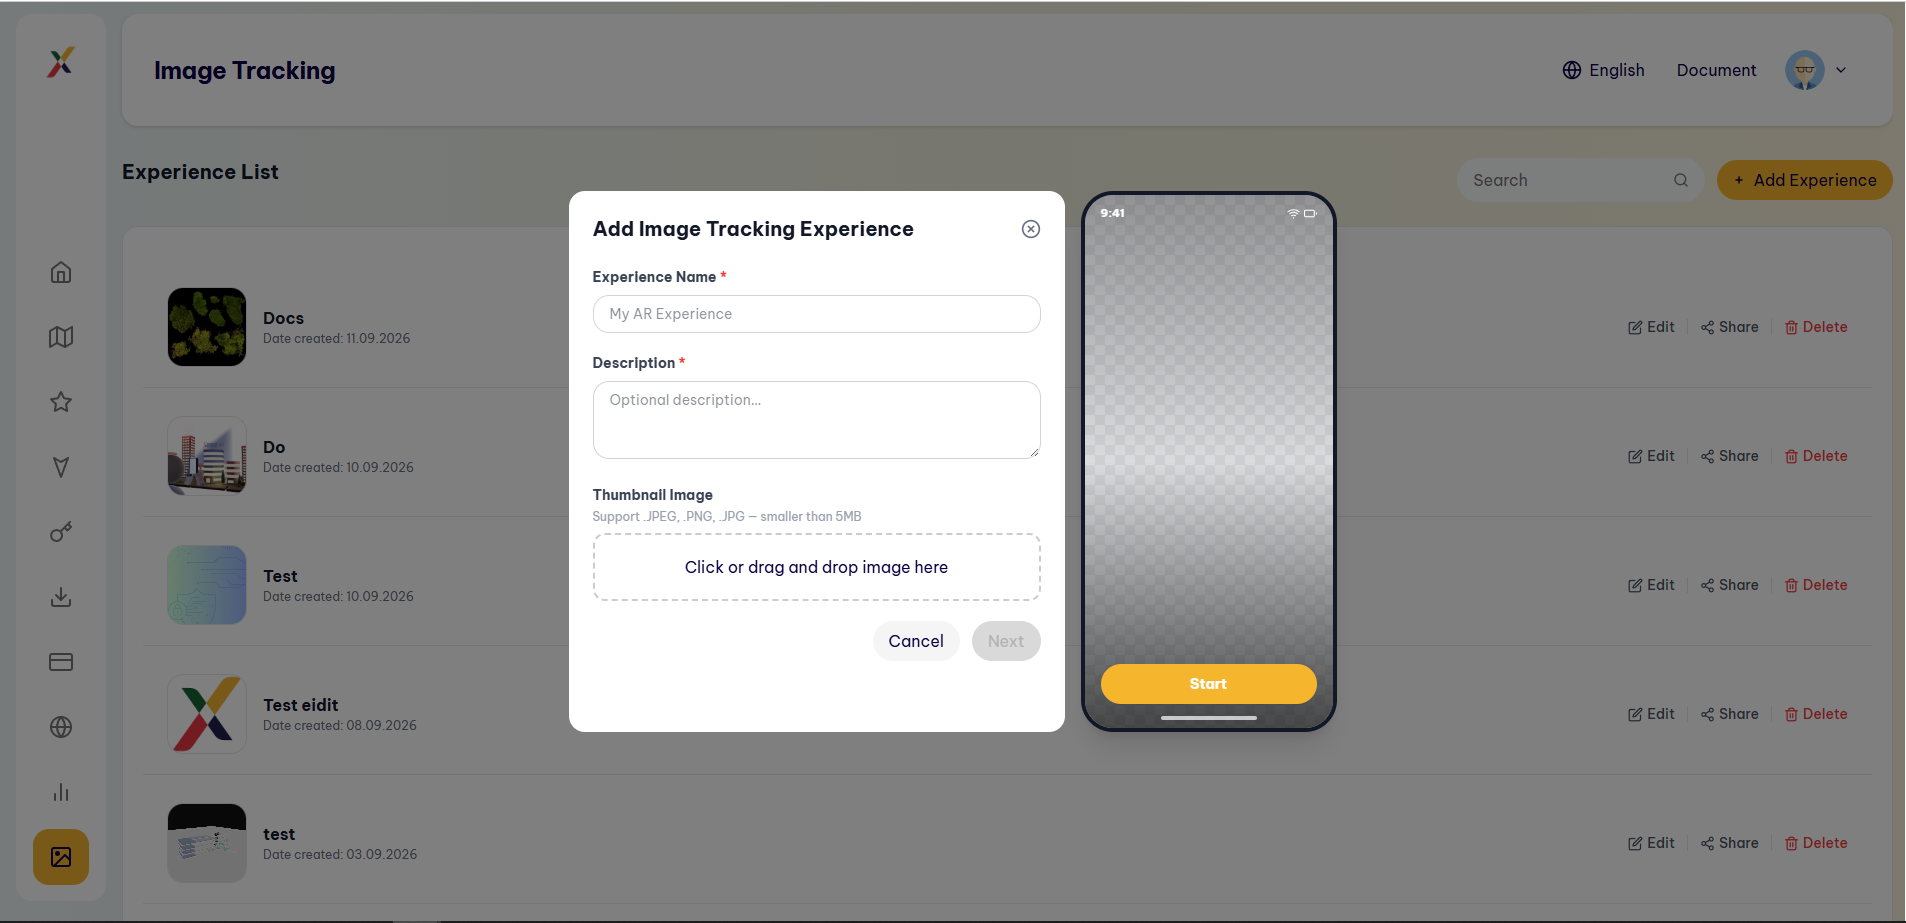
On the right side of the dialog is the Preview area, which simulates the mobile interface and displays the entered name, description, and thumbnail image.
Step 2 – Enter Information and Confirm
After entering the Experience Name, Description, and uploading the Thumbnail Image, the Preview area on the right automatically updates for review.
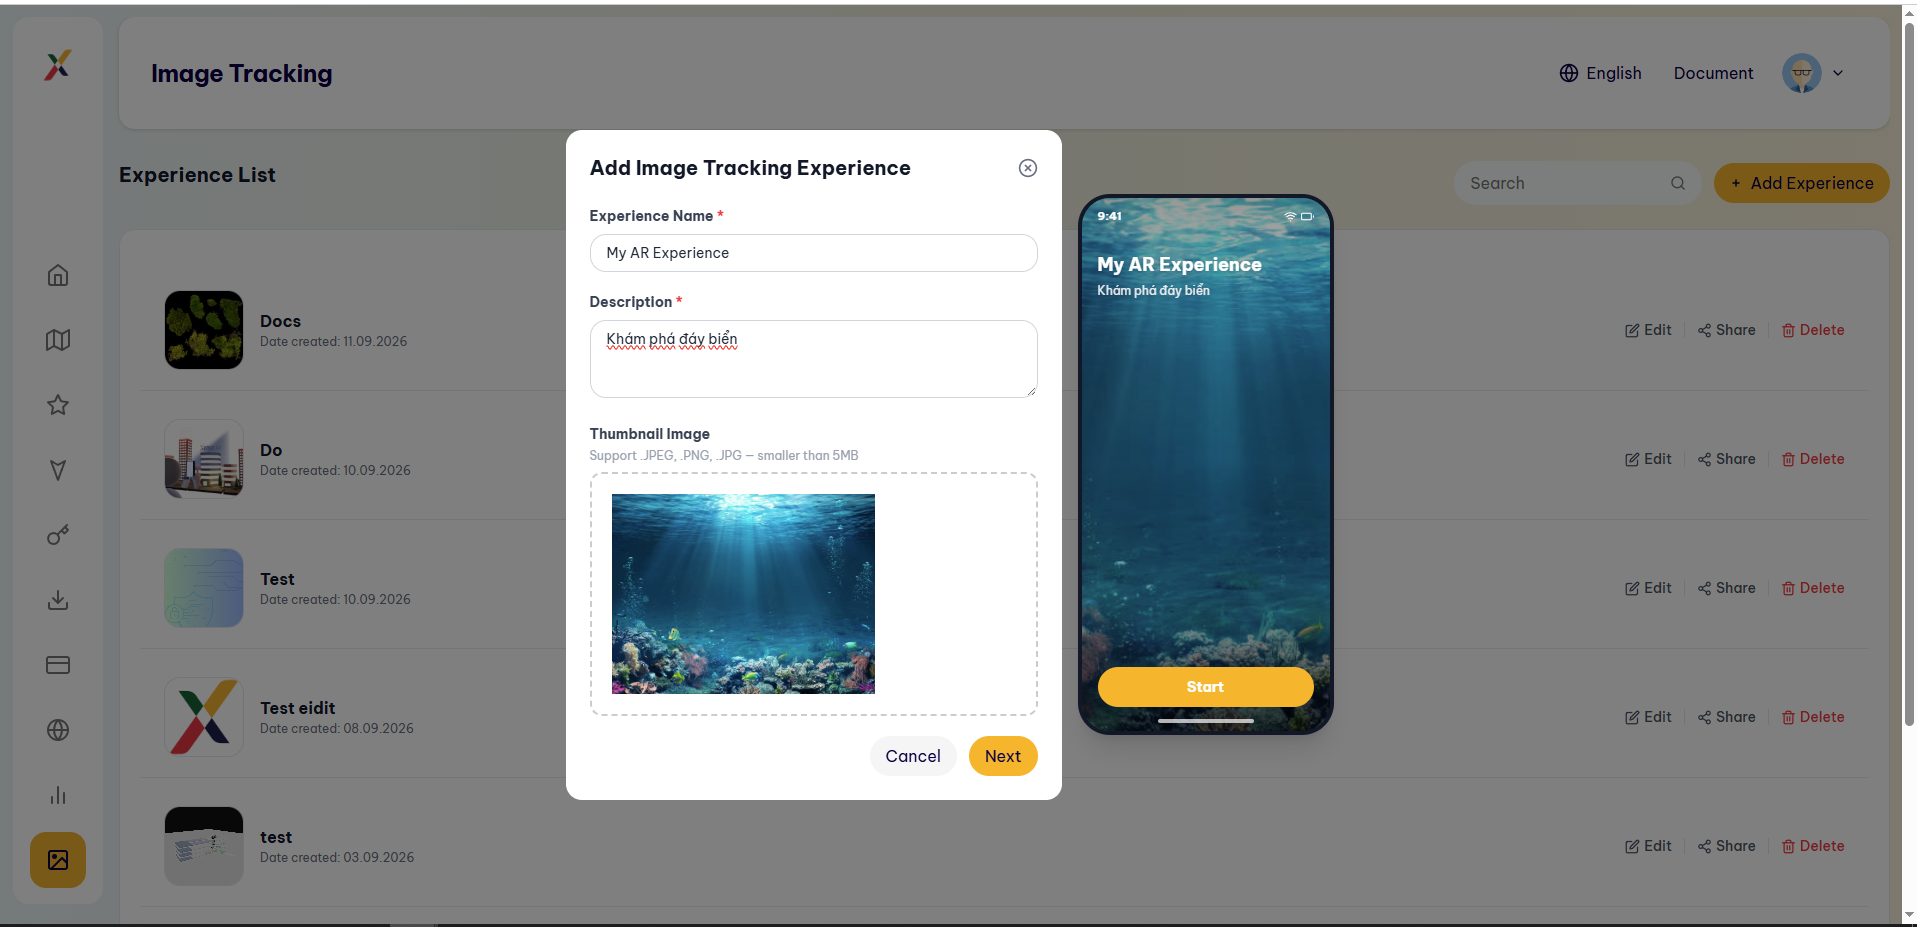
When the information is valid, the [Next] button is enabled. Click [Next] to continue to the Image Target and AR content configuration steps.
To cancel the operation, click [Cancel].
Step 3 – Open the Image Tracking Editor
After clicking [Next], the system opens the Editor screen with a 3D workspace (grid-based viewport), where you can attach the target image and 3D content.
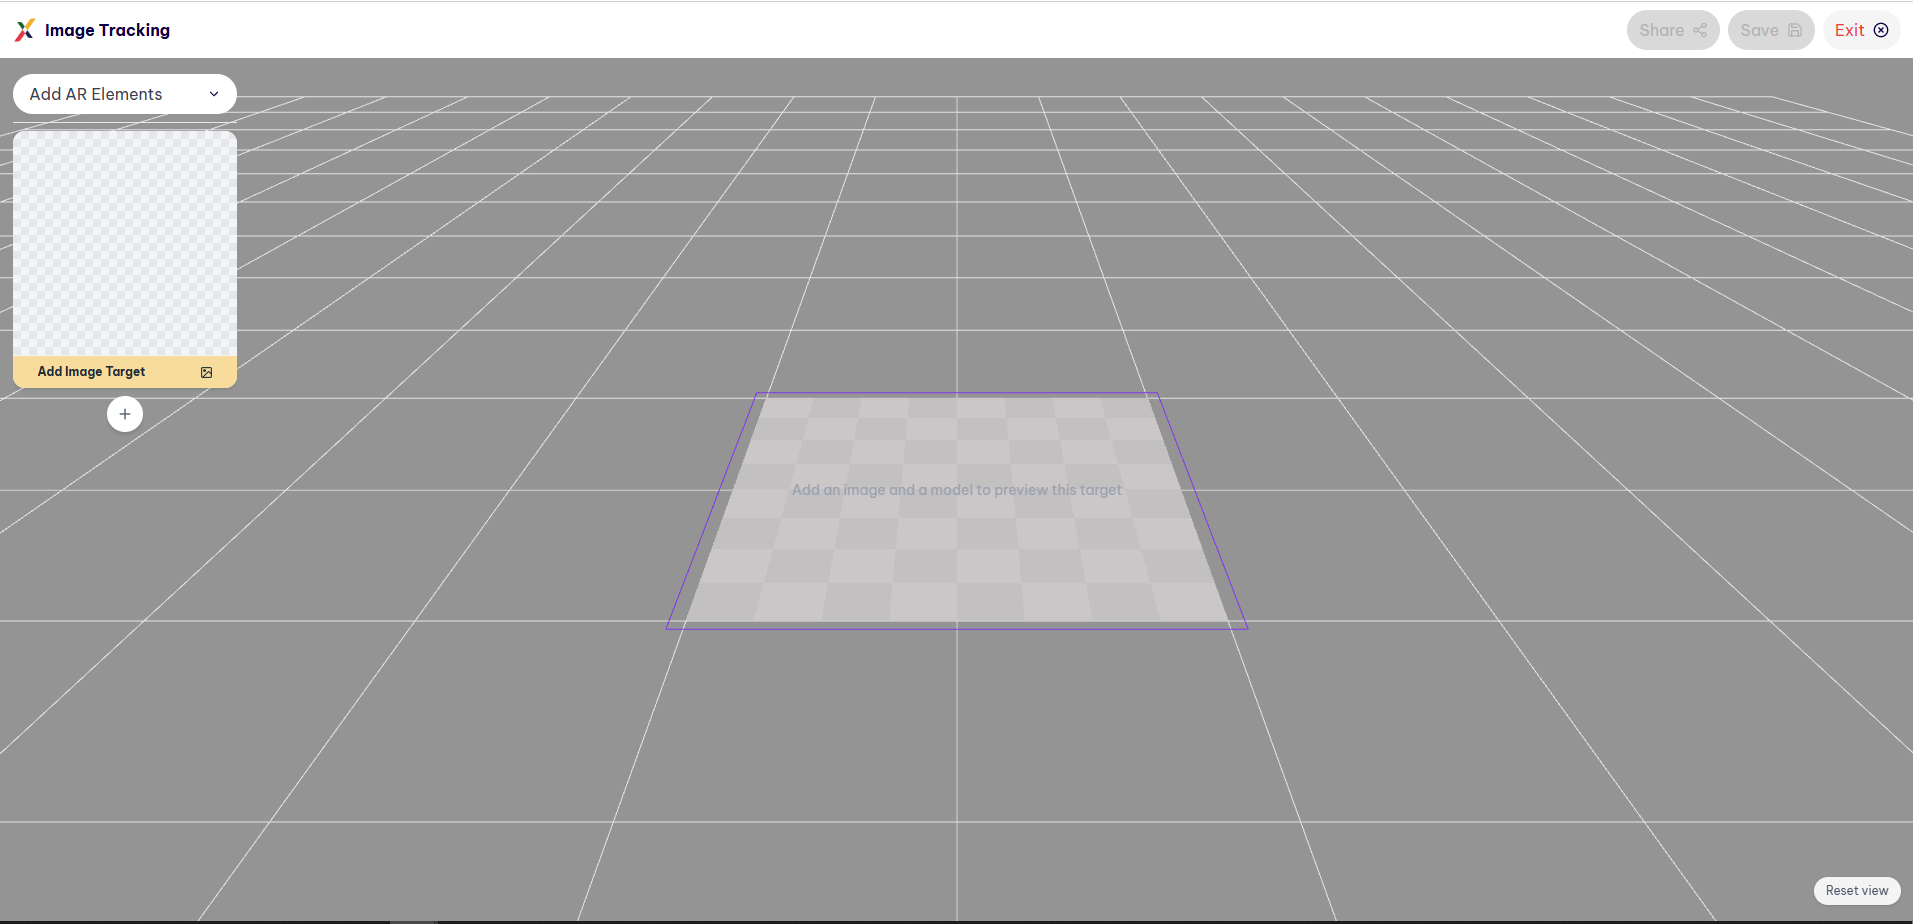
The Editor interface includes:
- Add AR Elements (upper-left corner): Menu for adding AR elements.
- Add Image Target tab: Used to configure the target image for the experience.
- Center area: 3D workspace displaying the plane representing the Image Target (purple border), with the message “Add an image and a model to preview this target” when no data has been added.
- Upper-right corner: Share, Save, and Exit buttons.
Step 4 – Add an Image Target
Click the [Add Image Target] tab. The Image Target dialog appears with two options:
- Upload Image: Upload an image directly from your computer.
- Image Link: Use an existing image URL.
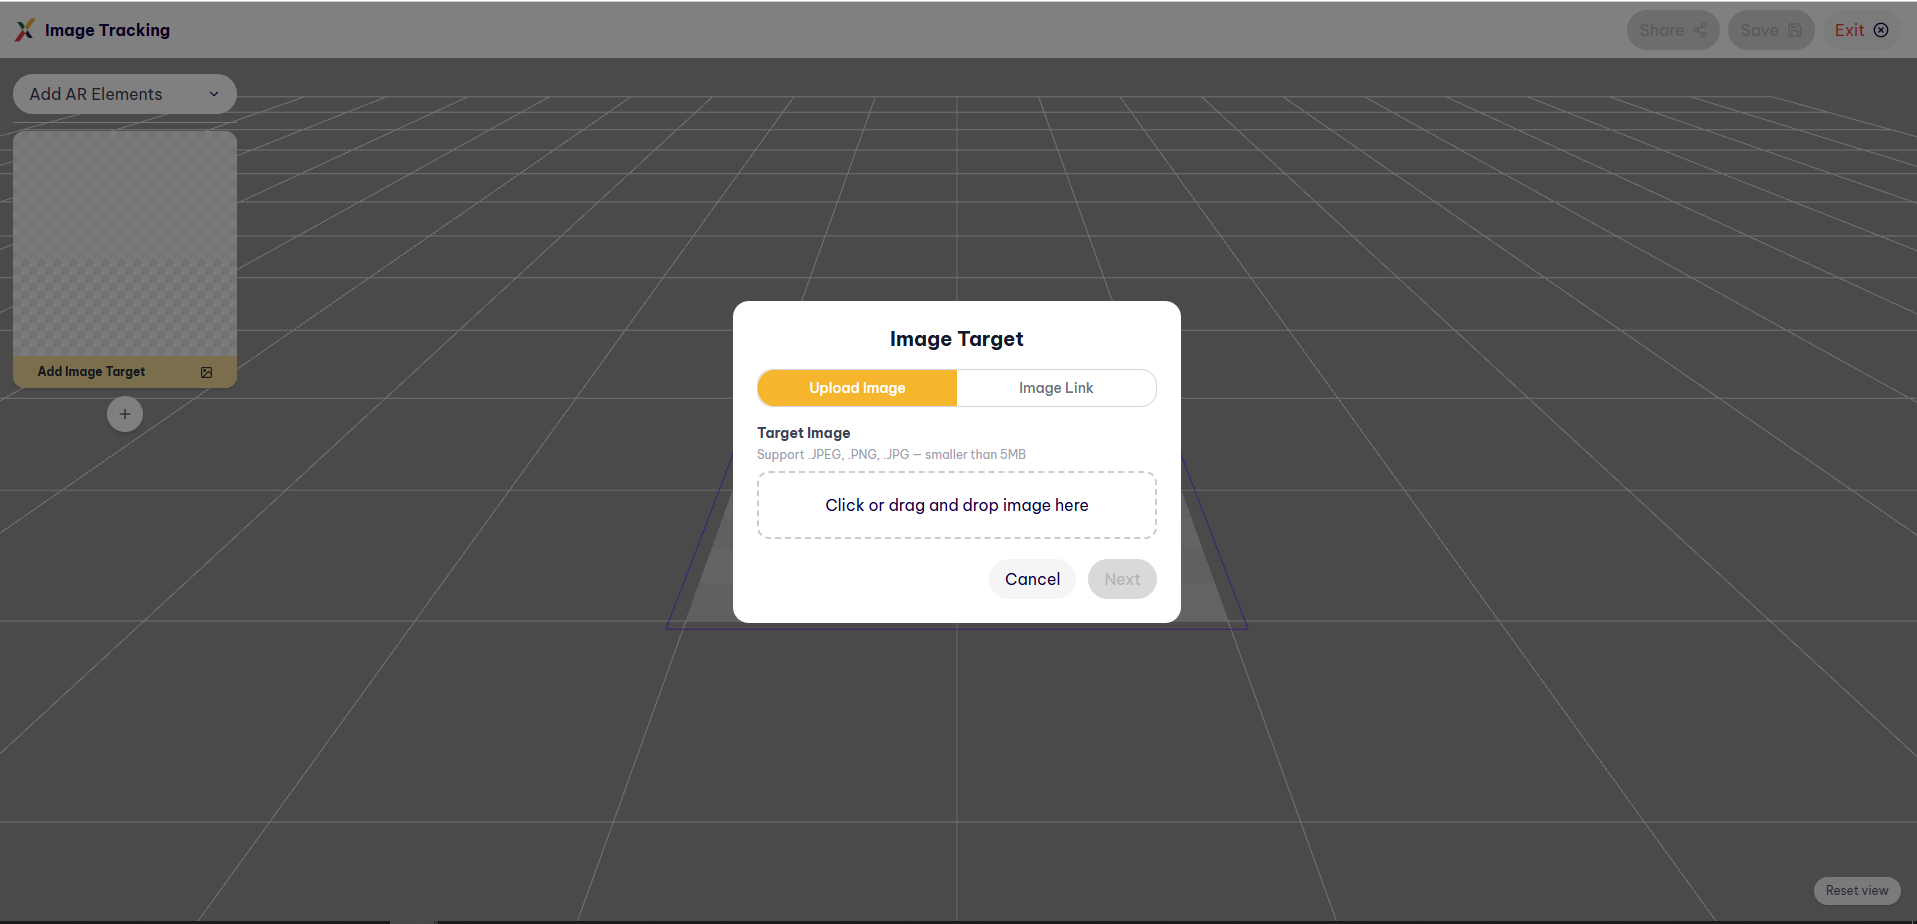
In the Upload Image tab, upload the Target Image. The system supports .JPEG, .PNG, and .JPG formats with a file size smaller than 5 MB.
This is the image that the mobile camera recognizes to trigger the AR content.
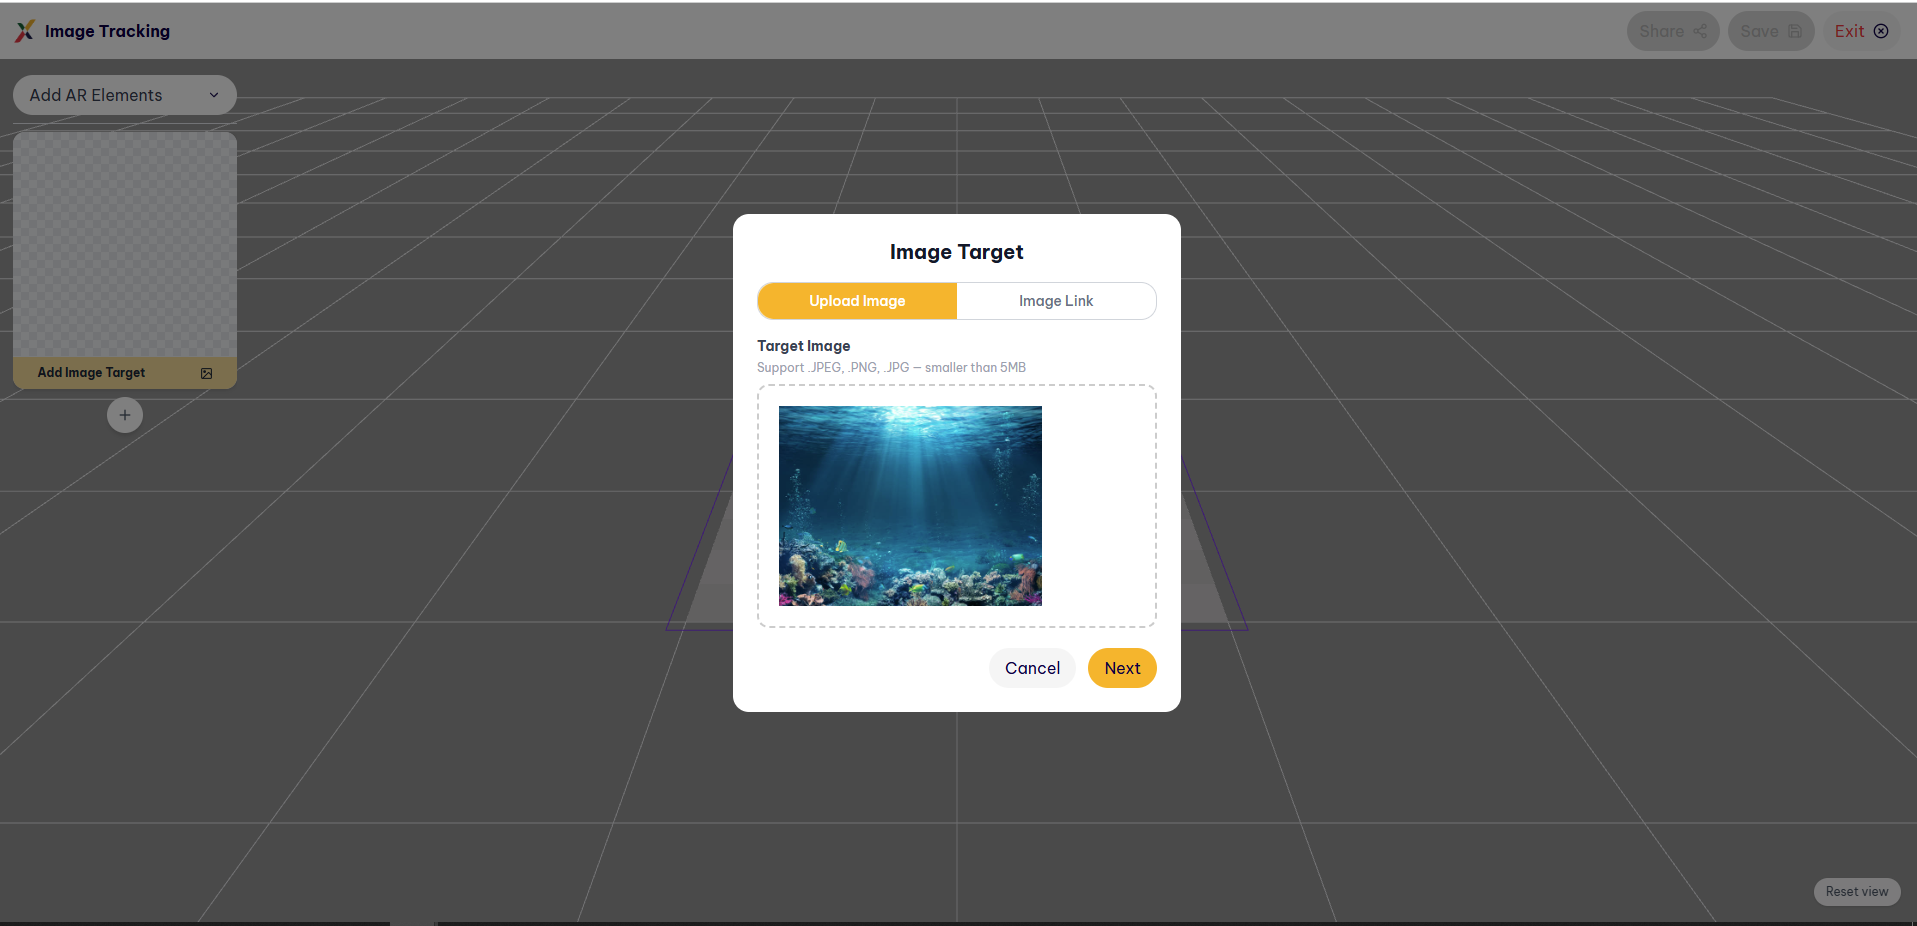
After selecting an image, click [Next] to confirm or [Cancel] to cancel.
Note: It is recommended to choose an image with many details and good contrast, while avoiding plain or repetitive patterns, to improve image recognition and tracking accuracy.
Step 5 – Add a 3D Model (AR Content) to the Image Target
After adding an Image Target, open the [Add AR Elements] menu again to select the 3D content to attach to the image.
The system provides the following methods for adding 3D models:
- Free Library: A library of available 3D models with a Search models… bar for quick searching.
- Sketchfab
- Upload
- Add Model Link
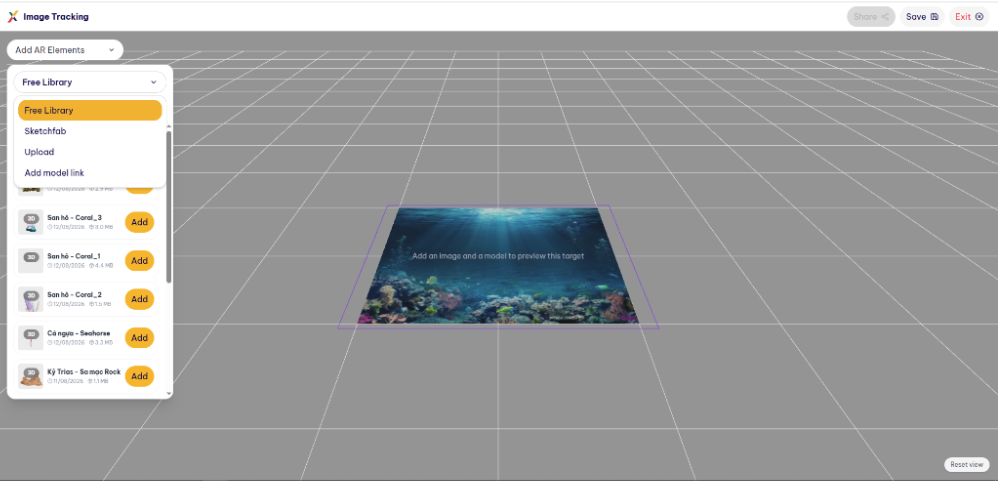
Click the [Add] button next to the desired model to add it to the experience.
The model is placed on the Image Target plane in the preview area.
On the left, the Image Target tab displays the number of attached models, for example, “1 model”.
Multiple 3D models can be added to the same Image Target.
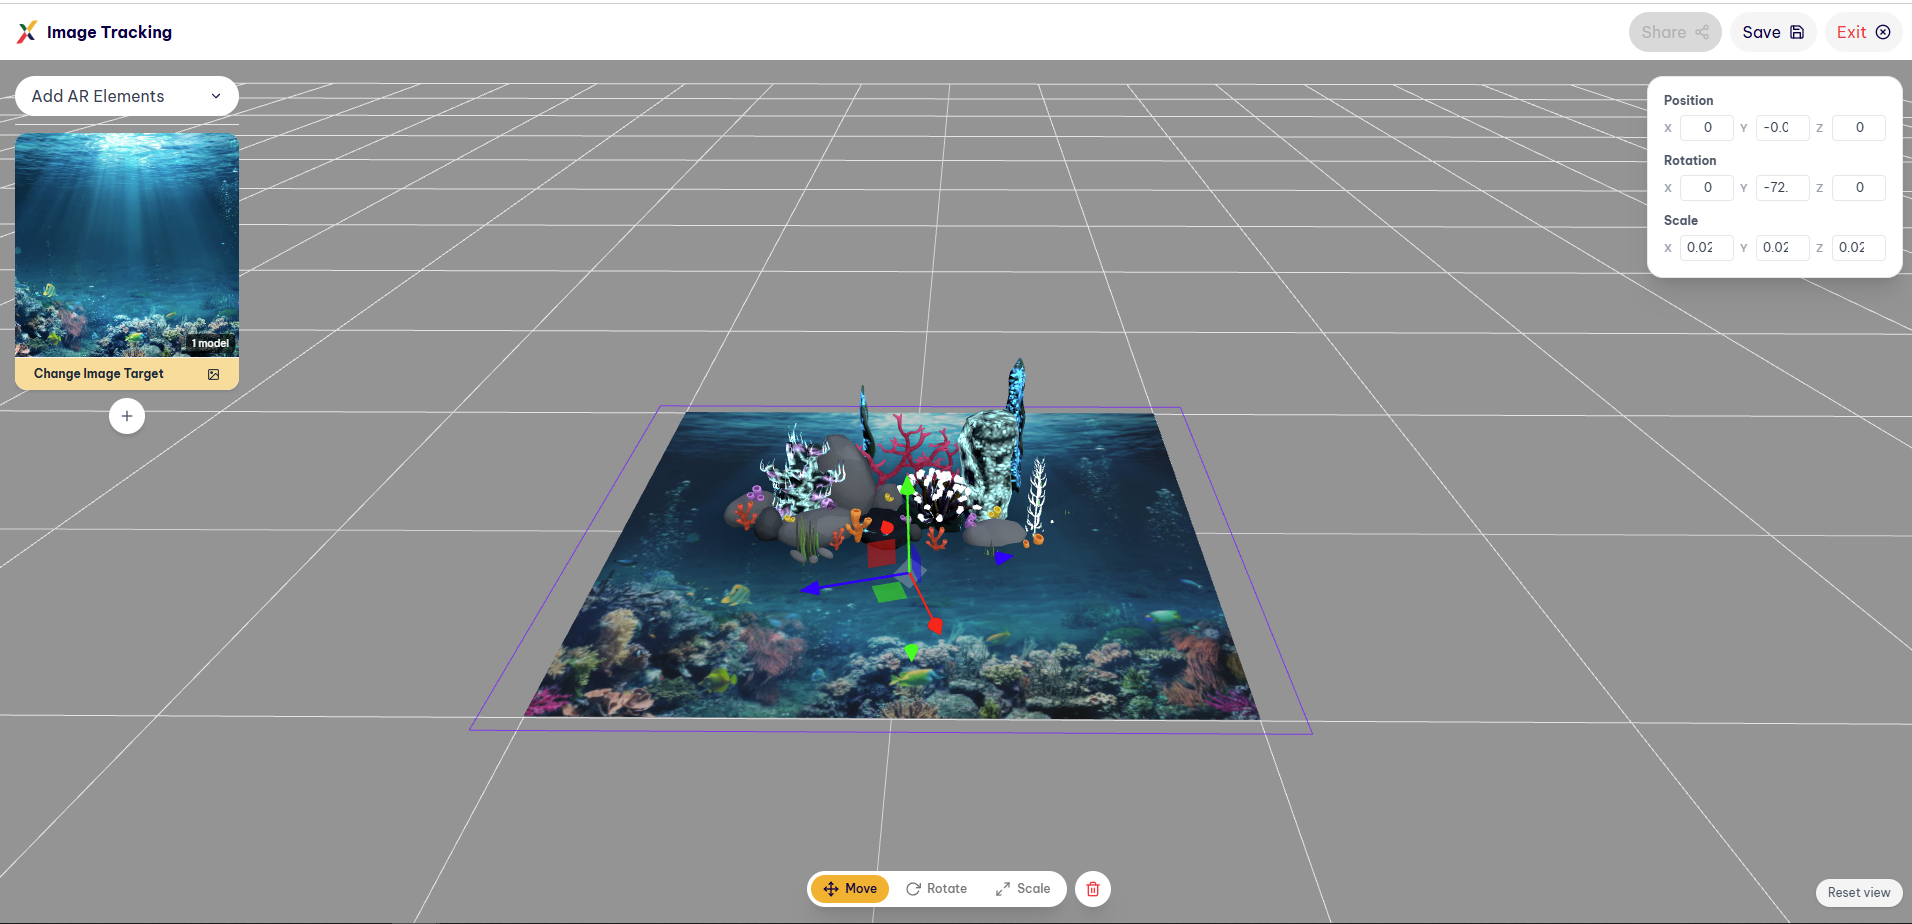
Step 6 – Adjust the Model Position, Rotation, and Scale
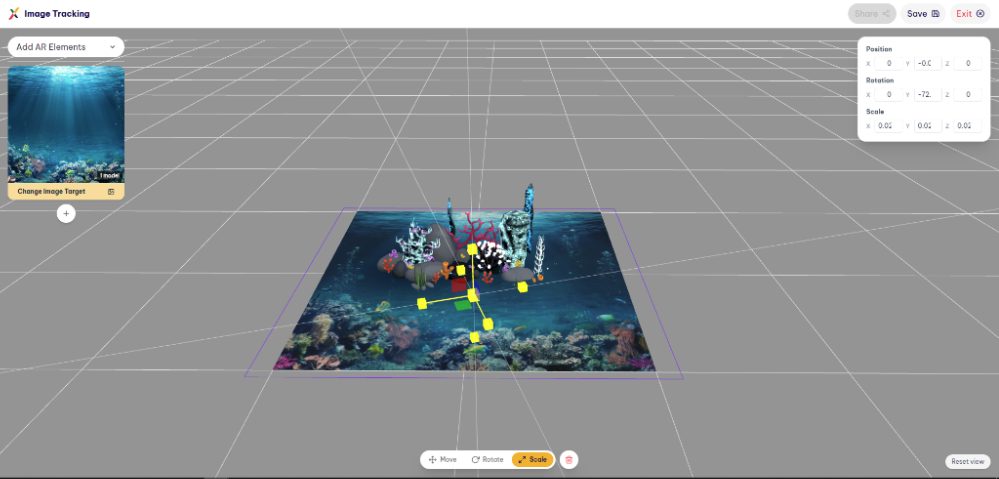
After adding a model, you can edit it directly in the 3D workspace using the toolbar at the bottom and the properties panel on the right.
The bottom toolbar includes:
- Move: Move the model.
- Rotate: Rotate the model.
- Scale: Resize the model.
- Delete: Delete the model.
The properties panel in the upper-right corner allows you to enter precise values:
- Position: X, Y, Z.
- Rotation: X, Y, Z.
- Scale: X, Y, Z.
Step 7 – Add More Image Targets and Models
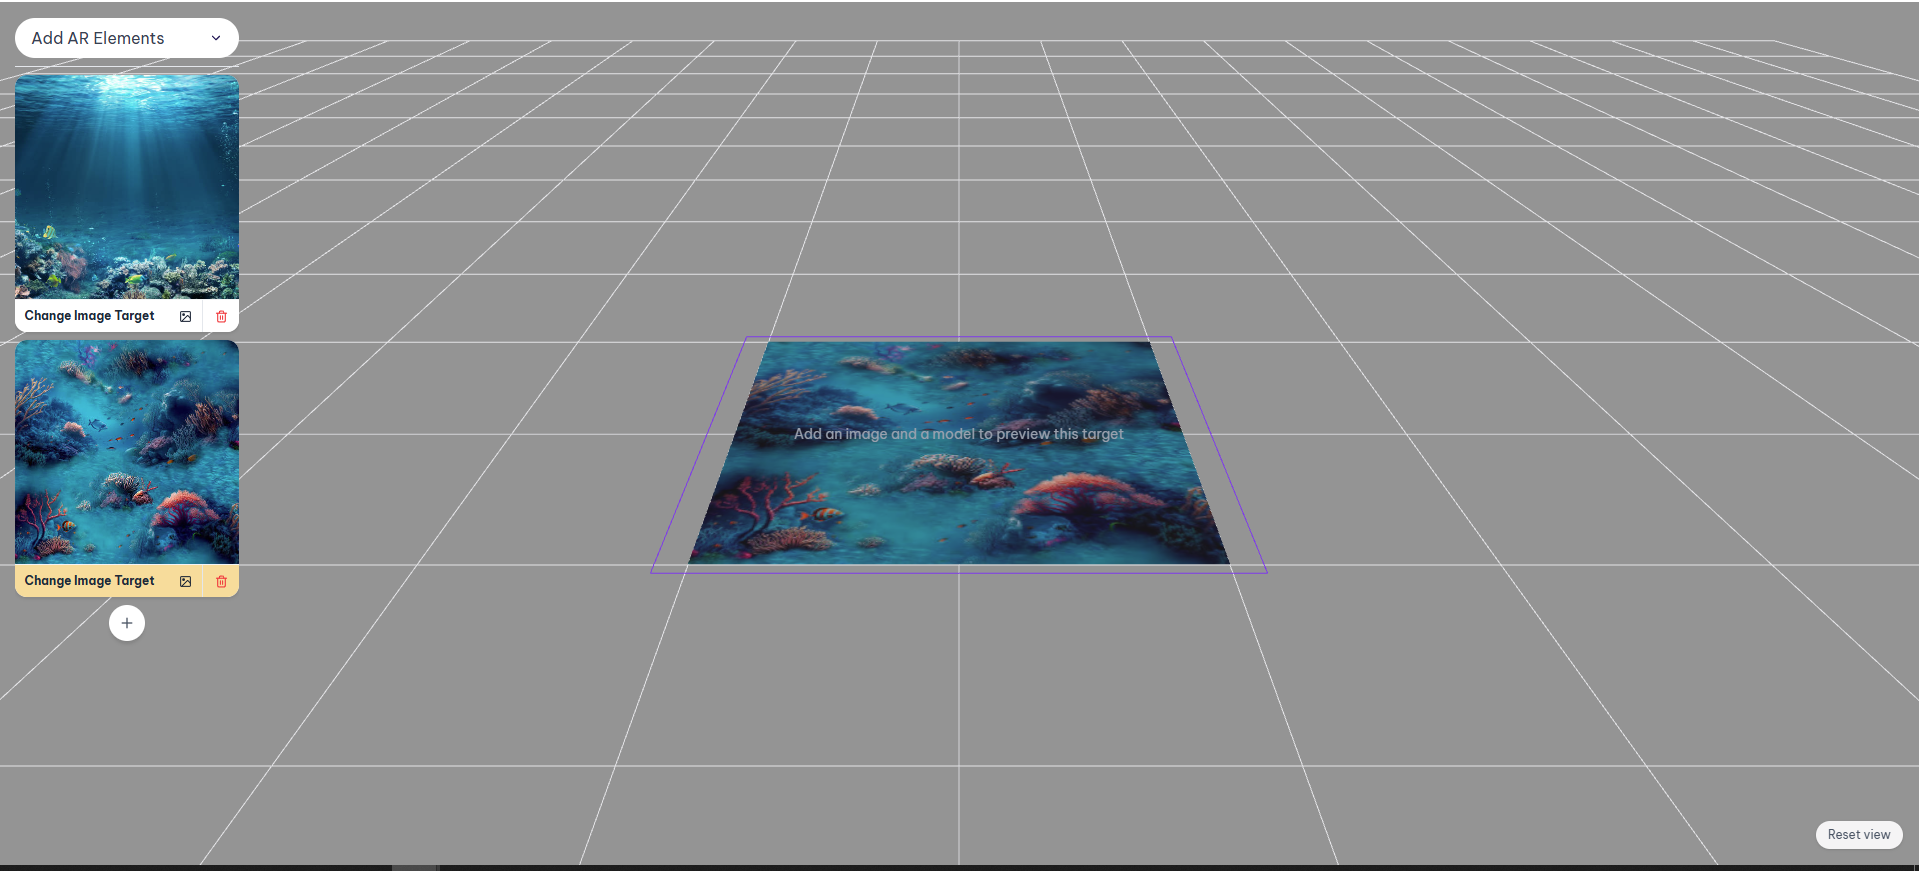
On the left, the Image Target tab provides the following options:
-
Change Image Target: Change to another target image.
-
+ : Add a new Image Target and attach 3D models to the new Image Target.
- An Experience can contain a maximum of 5 Image Targets.
-
Delete: Delete the Image Target and all 3D models associated with it.
Step 8 – Save the Experience
After completing the Image Target and 3D content configuration, click the [Save] button in the upper-right corner of the Editor screen to save the experience.
Step 9 – Share the Experience for Mobile Scanning
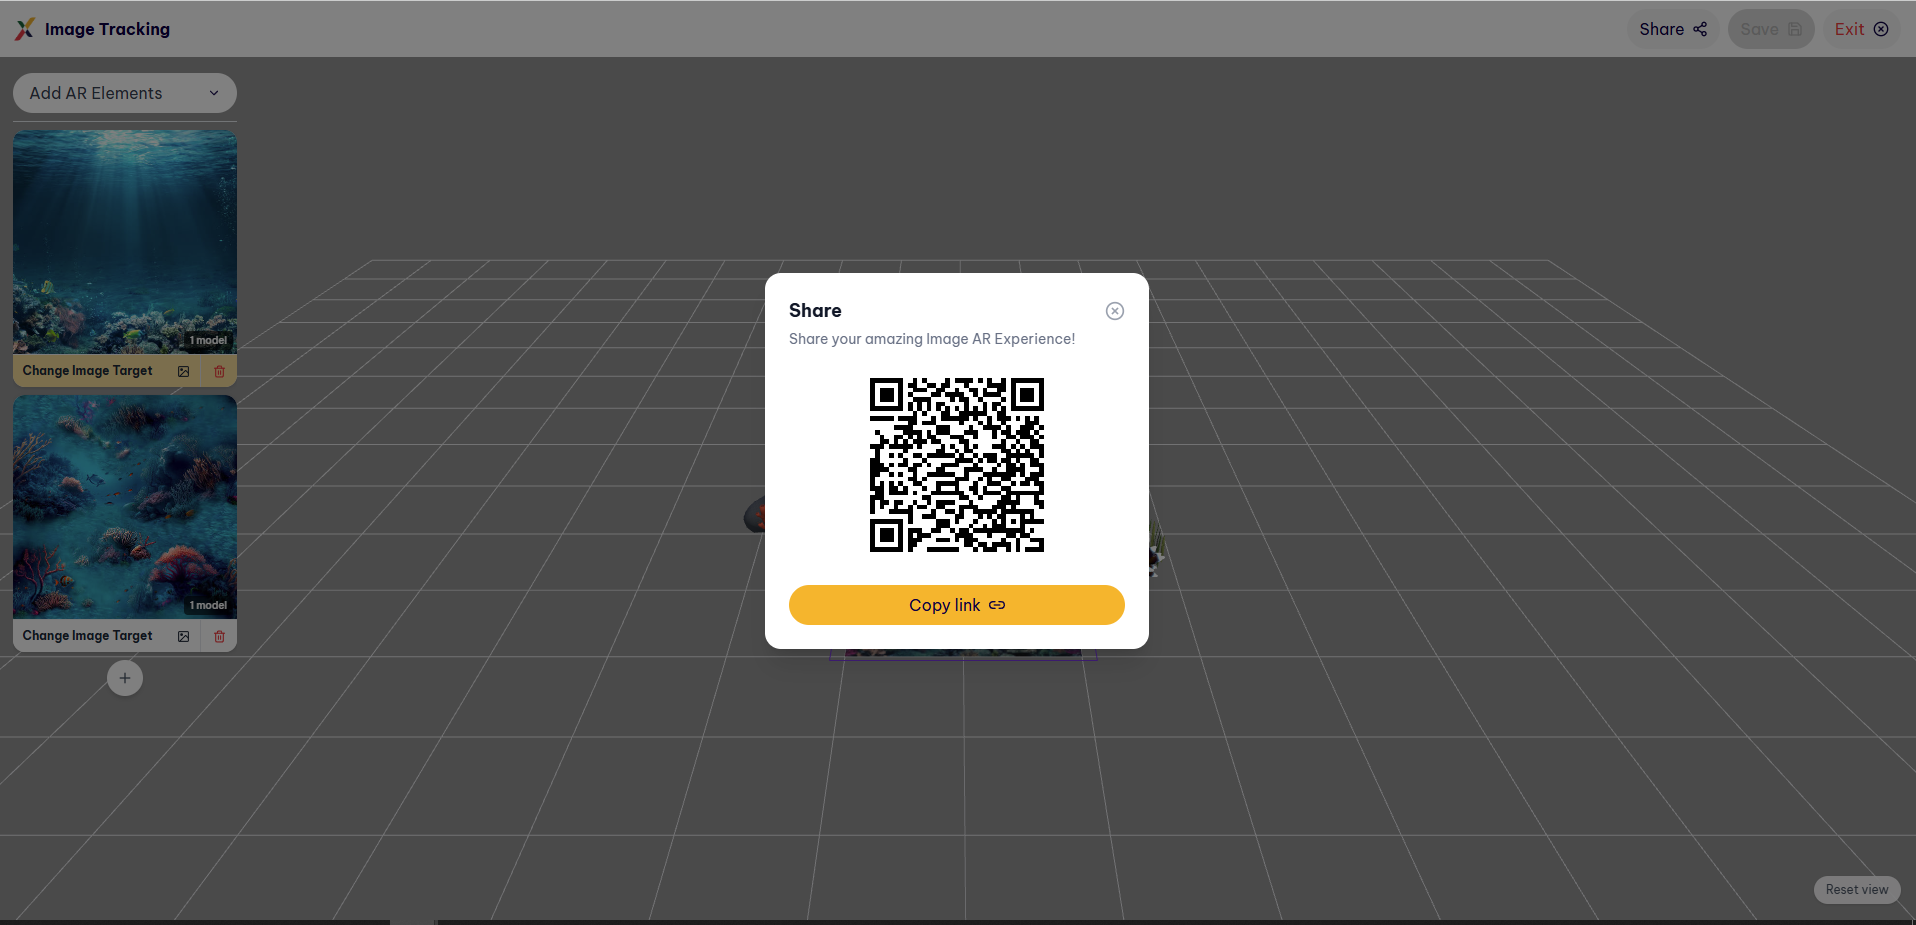
Click the [Share] button in the upper-right corner.
The Share dialog appears with:
- QR Code: Scan directly using a mobile phone camera.
- [Copy link]: Copy the experience URL to send via message/email or open directly in a mobile browser.
End User AR Experience
End users only need to:
- Scan the QR Code using their mobile phone camera or open the shared link in a mobile browser.
- Allow camera access when prompted.
- Point the camera at the configured image (Image Target).
- The 3D content automatically appears overlaid on the image directly in the browser, without requiring an additional application installation.
After completing the sharing and experience process, click [EXIT] to leave the Image Tracking Editor.
The system returns to the Image Tracking home screen (Experience List).
2. Edit an Experience
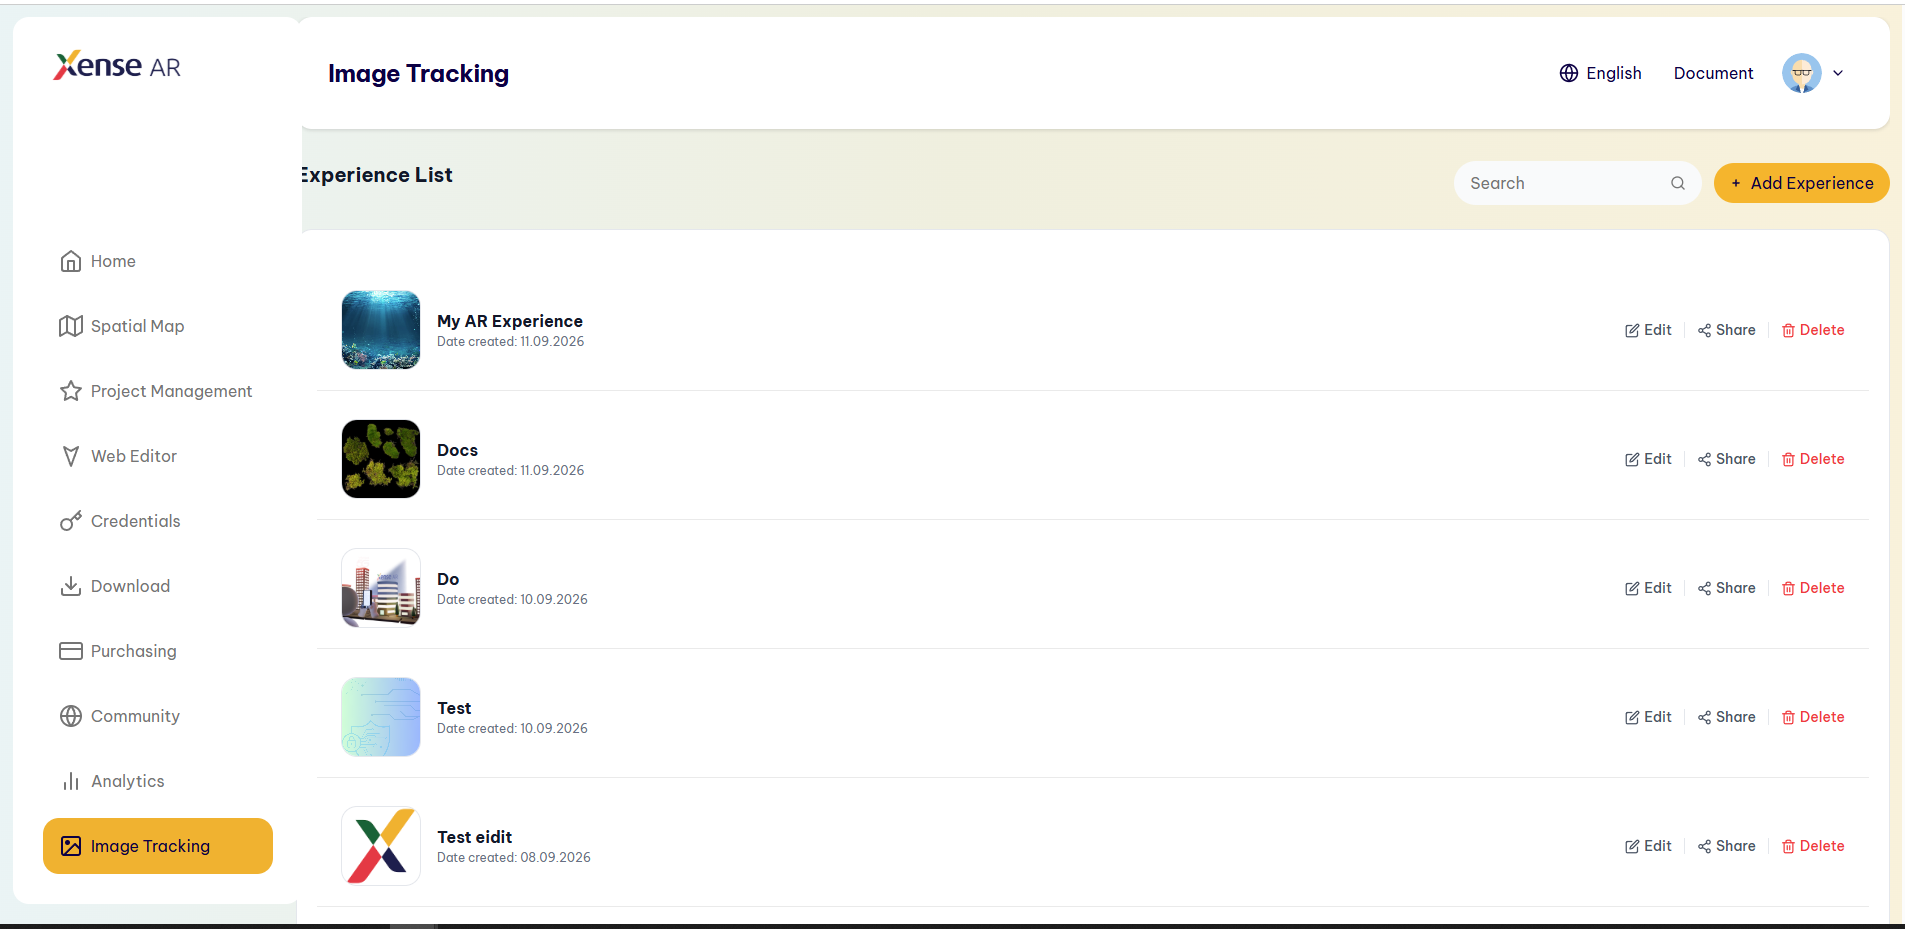
On the Image Tracking home screen (Experience List), the system displays the list of all created experiences, including the experience that was just saved.
From here, users can Edit, Share, or Delete any experience in the list.
Step 1 – Select an Experience to Edit
Click [Edit] for the Experience you want to edit.
Step 2 – Edit Experience Information
The Edit Experience dialog appears and displays the previously saved information:
- Experience Name
- Description
- Thumbnail Image
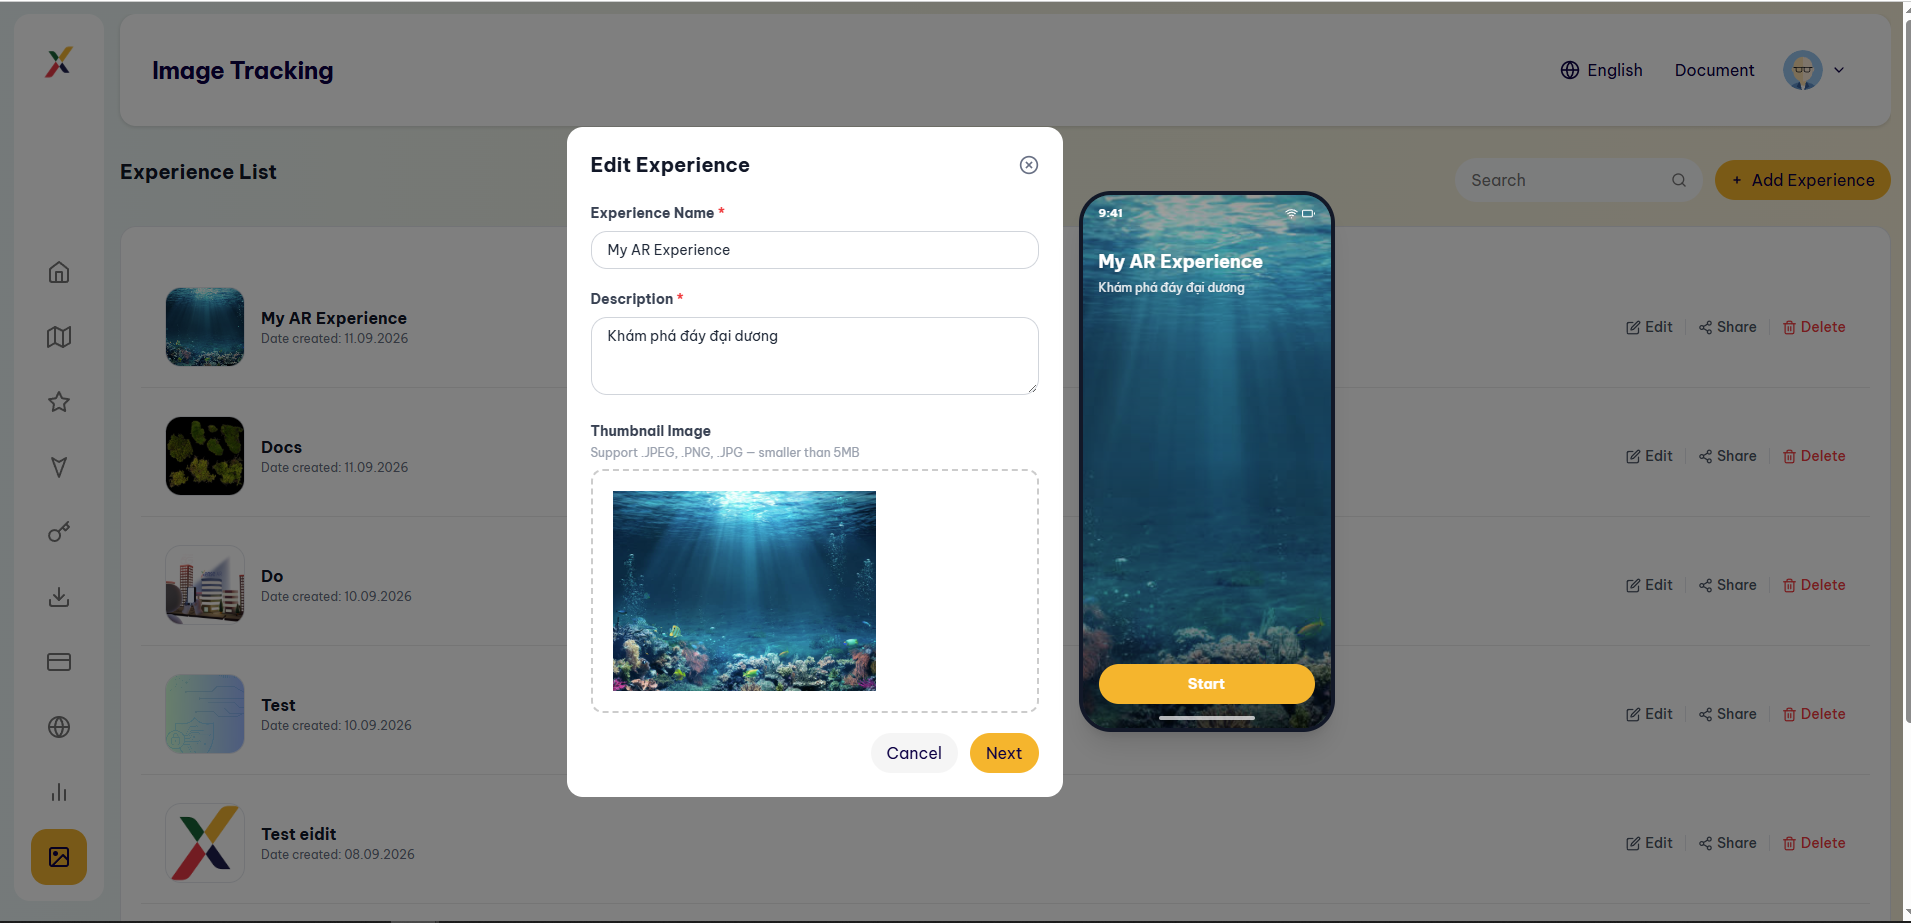
The Preview area on the right (mobile interface) updates in real time when you change the name, description, or thumbnail image.
After editing:
- Click [Next] to save the changes and continue to the Editor screen, where you can continue editing the Image Target and 3D models if needed.
- Click [Cancel] to discard the changes.
3. Quick Share an Experience
Step 1 – Share an Experience
In the Experience List, click [Share] for the Experience you want to share.
There is no need to open the Editor.
Step 2 – Use the Sharing Information
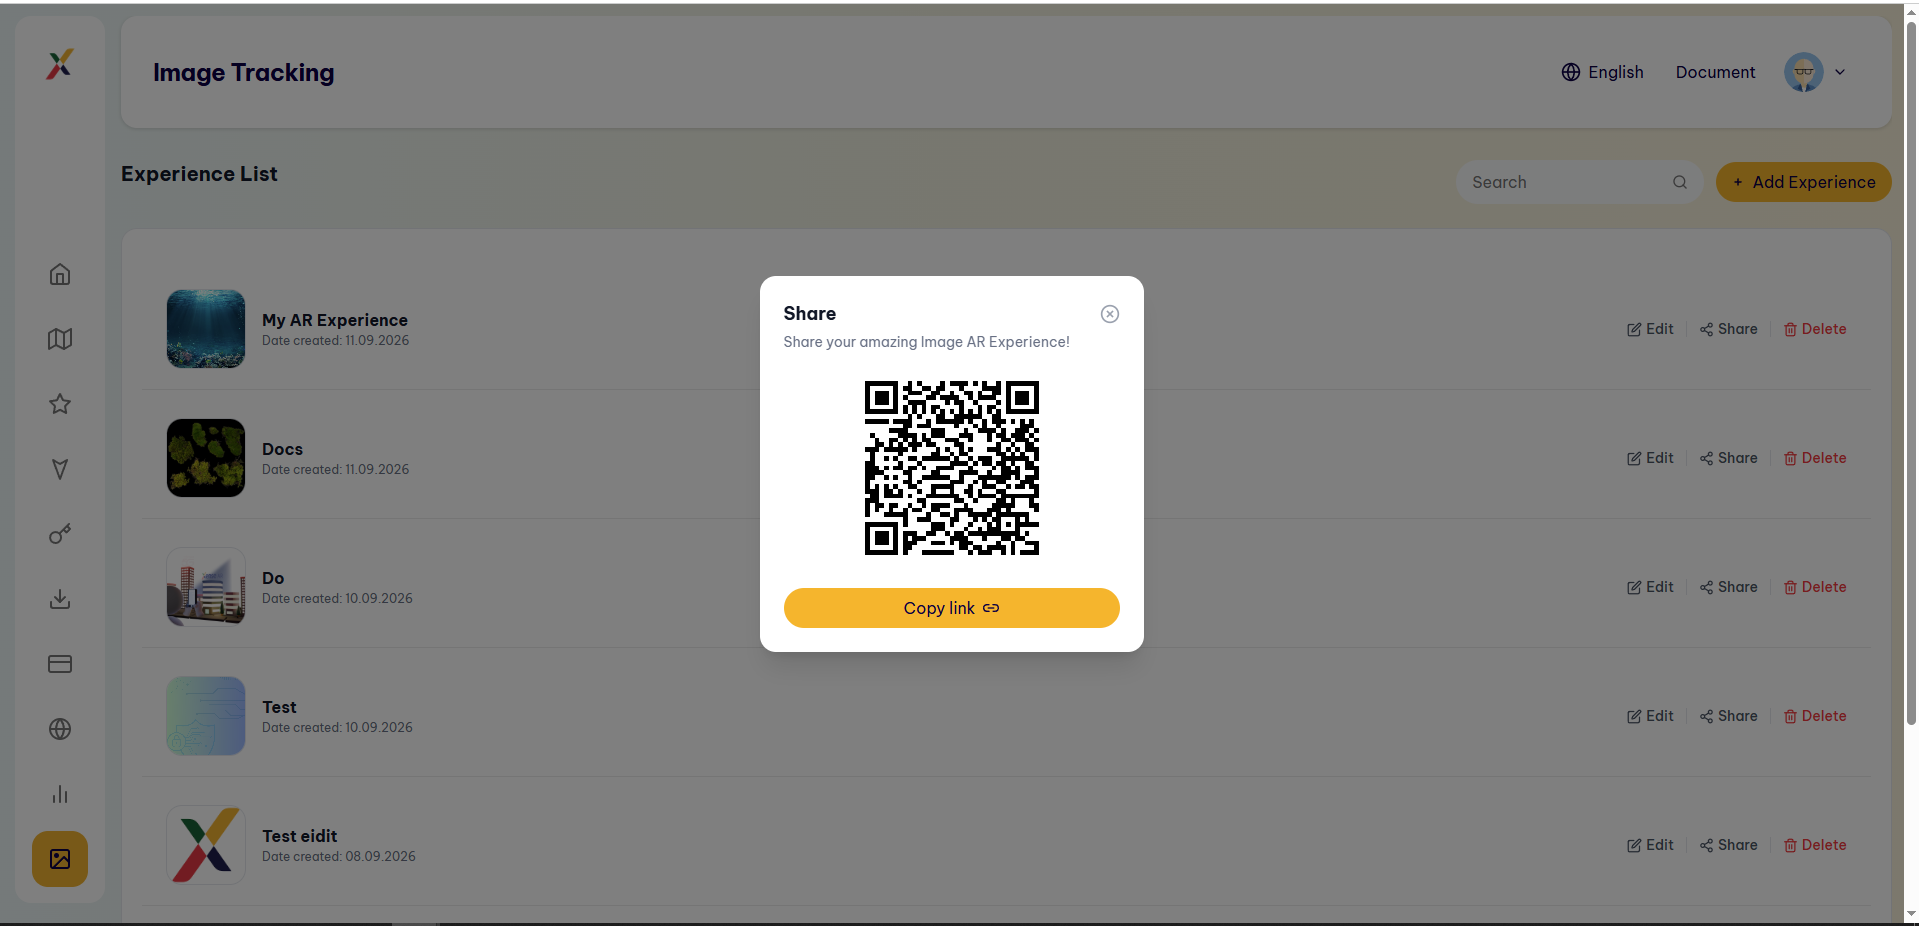
The Share dialog appears with:
- QR Code: Scan directly using a mobile phone camera.
- [Copy link]: Copy the experience URL.
4. Delete an Experience
In the Experience List, click [Delete] for the Experience you want to delete.
The system displays a confirmation dialog:
“Delete this? Are you sure you’d like to delete this? This is permanent and cannot be undone!”
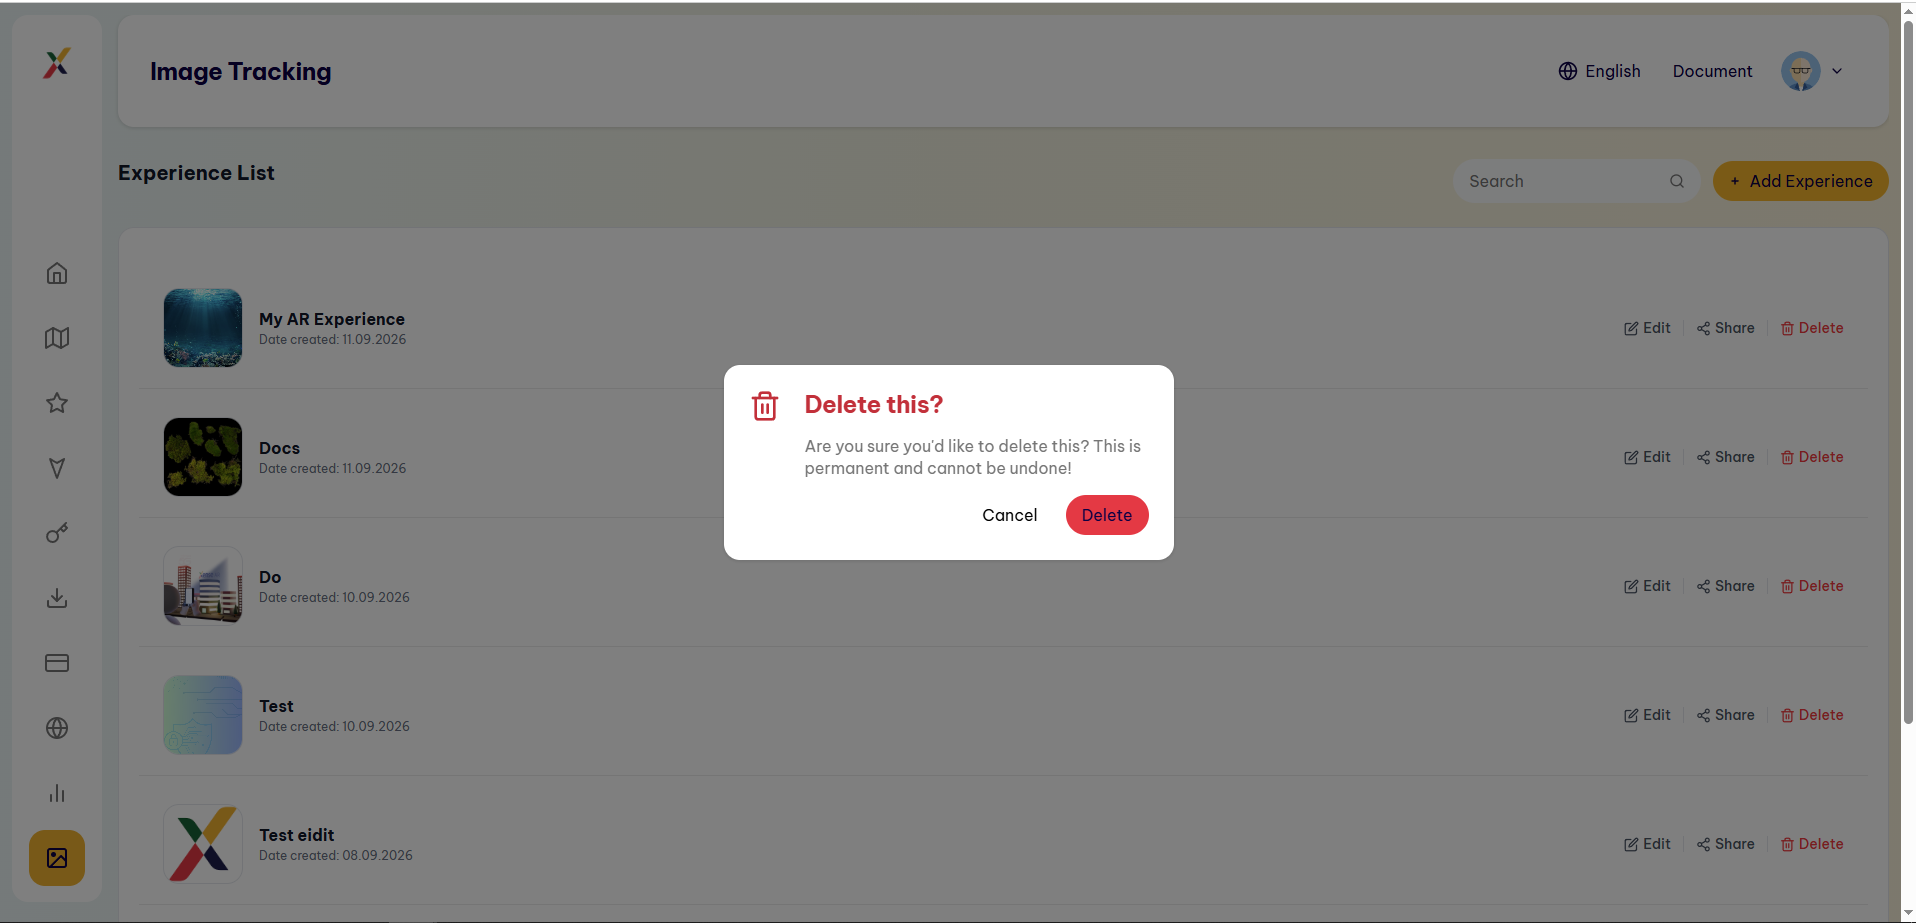
The user can choose:
- [Delete]: Red button that permanently deletes the Experience.
- [Cancel]: Cancels the operation and keeps the Experience.