CONTENT EDITOR USER GUIDE
1. Overview
Content Editor is the content editing area in the XenseAR Web Editor, allowing users to add, position, and configure AR content directly within the Project’s 3D space.
Through Content Editor, users can place digital content into an established real-world space, define its display position, and adjust content properties according to the requirements of the AR experience.
Web Editor runs in a web browser and provides intuitive interaction mechanisms such as Drag & Drop, making it suitable for building AR experiences without requiring advanced programming knowledge.
2. Purpose
Content Editor is used to:
- Add AR content to a Project.
- Select and manage content already available in the Project.
- Place content at the desired position in the 3D space.
- Adjust the position, rotation, and scale of objects.
- Check how content is positioned within the space.
- Edit or delete content when necessary.
- Save changes during the editing process.
3. Prerequisites
Before editing content, make sure that:
- A Project has been created.
- The Project is linked to the appropriate Spatial Map/3D Space.
- The 3D space (Map 3D/Map 2.5D) has been successfully loaded in Web Editor.
- The content files to be used have been prepared and meet the system’s technical requirements.
The quality of spatial data directly affects the accuracy of AR content alignment in the real-world environment.
4. Content Editor Interface
Content Editor can be divided into the following main functional areas:
Content/Asset List
Displays the content available for use in the Project.
Users can select the required content and place it into the 3D space to begin editing.
3D Viewport
Displays the Project’s 3D space.
Users can observe the position of objects and perform content placement operations within the space.
Object/Content Properties
Displays the properties of the selected content.
Depending on the content type and Editor version, the available properties may include:
- Position – Position.
- Rotation – Rotation angle.
- Scale – Size/scale.
- Other display or configuration properties related to the content.
5. Adding Content to a Project
Step 1: Open Content Editor
Navigate to: Web Editor → Map Editor → Project → Content.
Make sure the 3D space has been fully loaded before proceeding with the next steps.
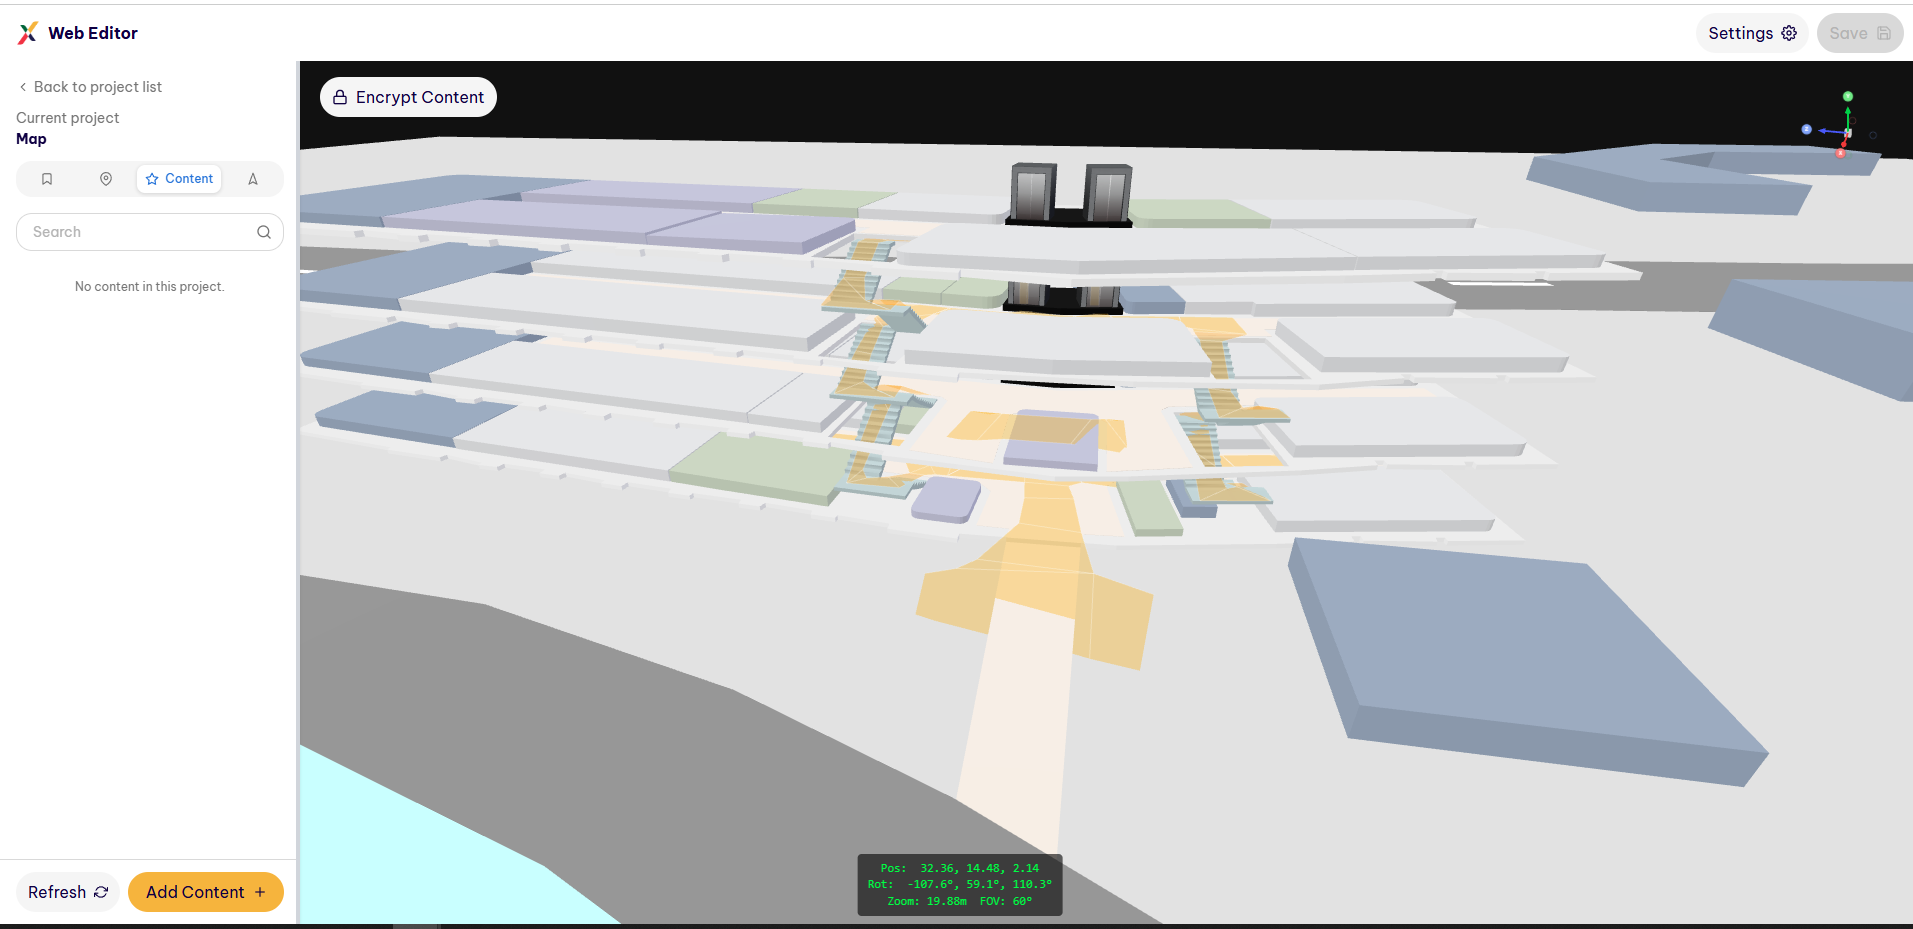
Step 2: Add Content to the 3D Space
XenseAR currently supports 3D models such as .glb.
Select “Add Content”, then in the Project’s 3D space, identify the desired position for the content and click “Click”.
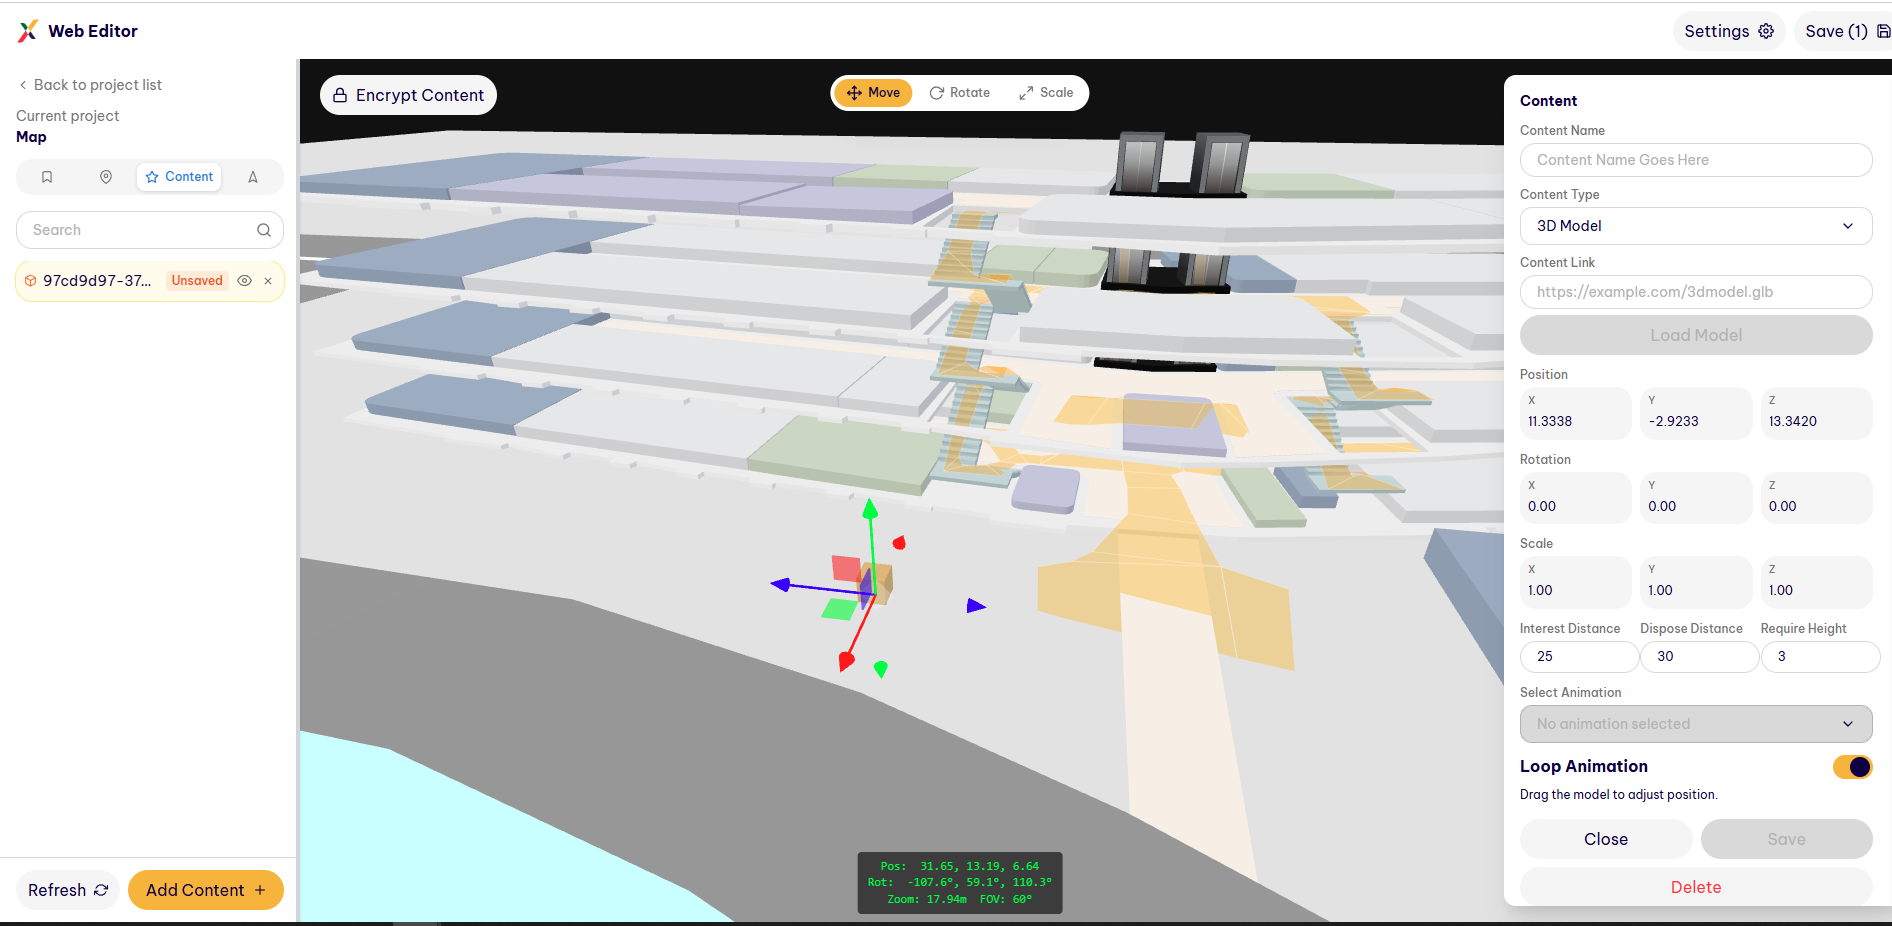
Step 3: Enter the Content URL and Load the Model
Users can use the Content URL of content stored on a server managed by their organization, or select content from Community/Free Asset and copy its URL.
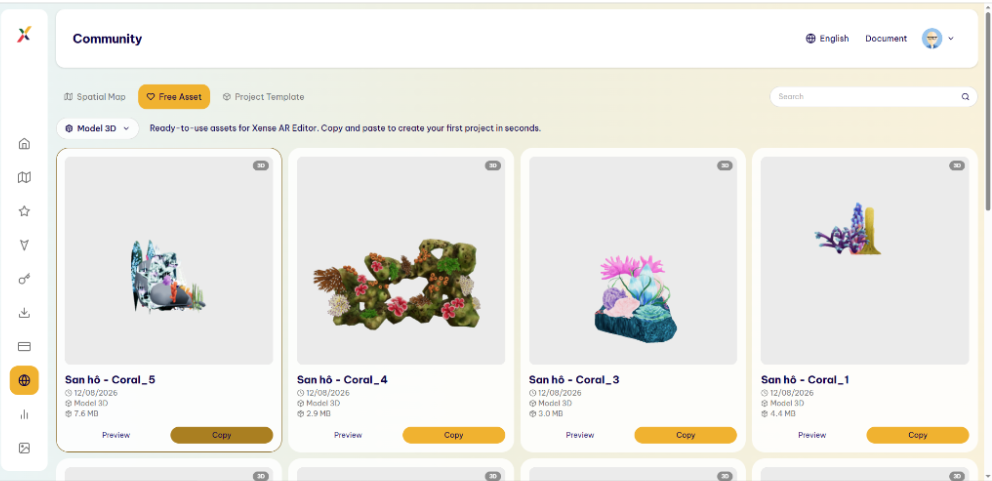
Follow these steps:
- Copy the URL of the Content to be used.
- Paste the URL into the Content Link field.
- Click Load Model to load the content into Web Editor.
- After the content is successfully loaded, the Model will be displayed in the Scene, and users can continue configuring its properties.
Note: Make sure the Content Link is a valid URL and that the content is accessible from the system so that the Model can be loaded successfully.
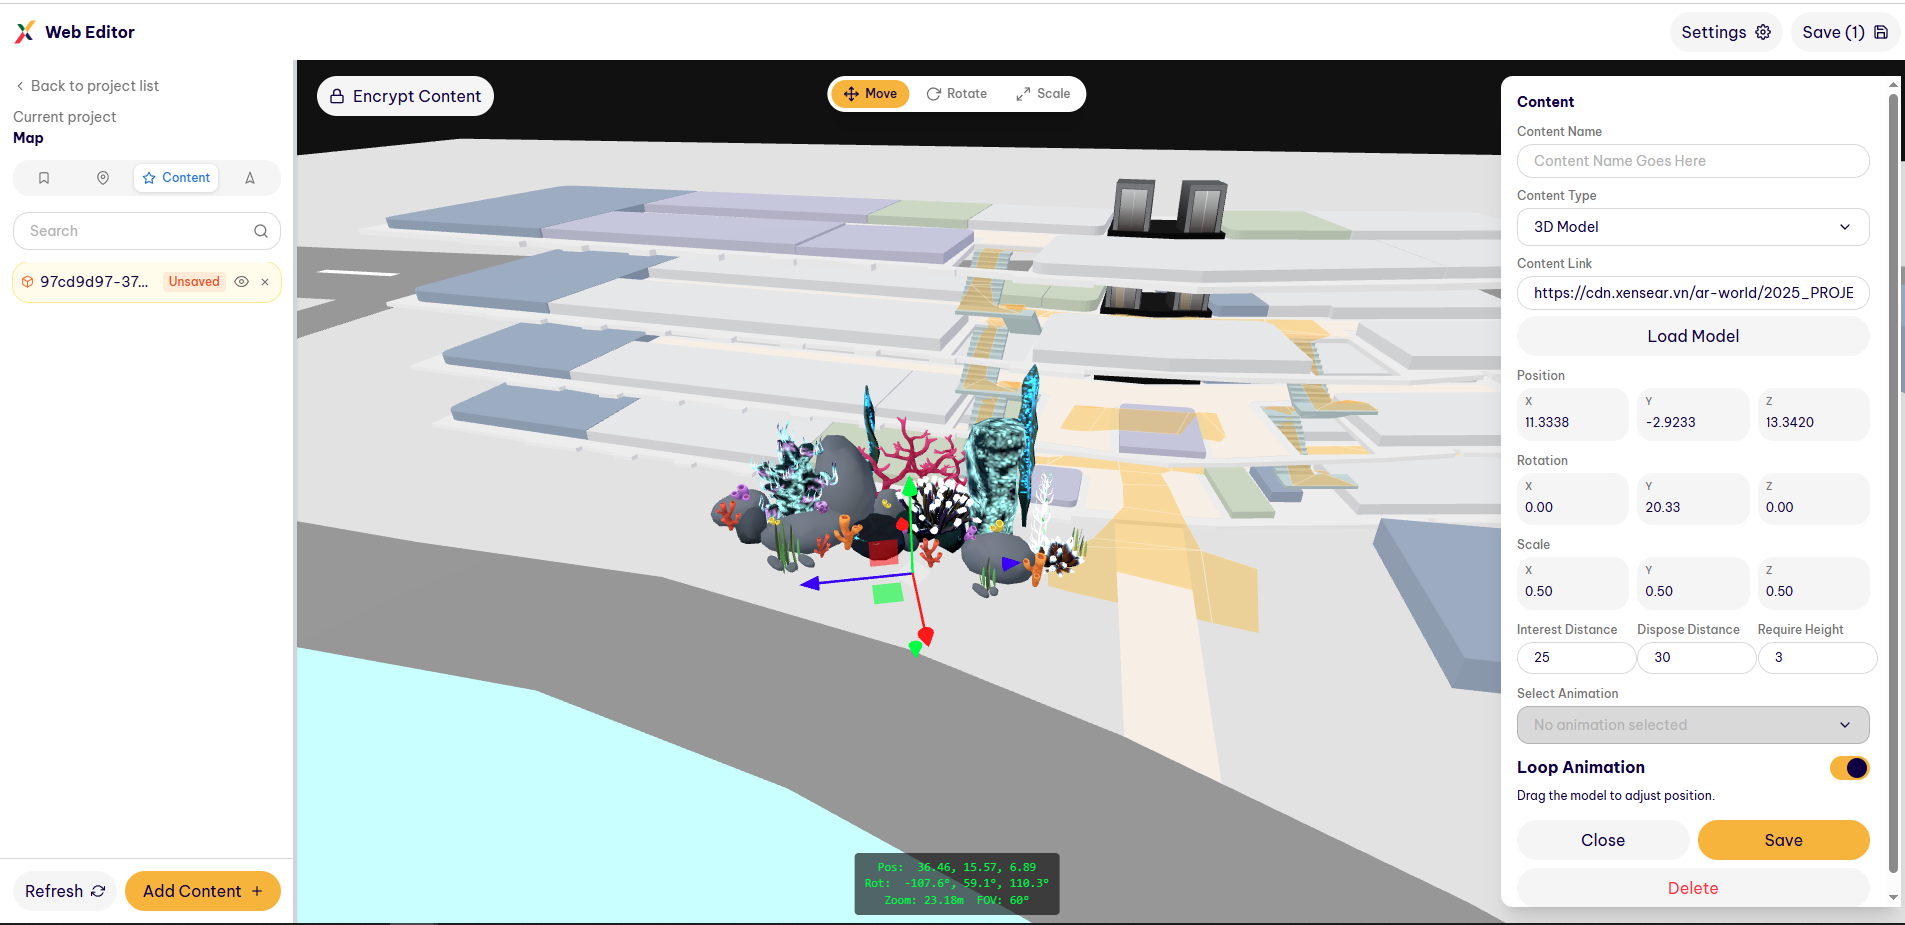
Step 4: Configure Content Properties
After adding content, users can configure its properties, including Content Name, Position, Rotation, Scale, Interest Distance, Dispose Distance, and Require Height.
These properties define the content’s information, position, orientation, size, and display range within the 3D space.
| Property | Description |
|---|---|
| Content Name | The name of the content used in the Project. Users can assign a name to make the content easier to identify and manage. |
| Position | Defines the position of the content in 3D space along the X, Y, Z axes. |
| Rotation | Defines the rotation angle and display orientation of the content in 3D space along the X, Y, Z axes. |
| Scale | Defines the size and scale of the content in 3D space. The value can be adjusted along the X, Y, Z axes. |
| Interest Distance | The maximum distance from the Camera at which the content is displayed. |
| Dispose Distance | The distance from the Camera beyond which the content is hidden. |
| Require Height | The vertical range measured from the center of the content in both upward and downward directions, defining the conditions under which the content is displayed. |
6. Editing Content
Position
Select the object to edit and use the Position property to change its position.
- X: Horizontal position.
- Y: Height position.
- Z: Depth position.
Make sure the object is positioned correctly in the real-world space to minimize alignment errors during the AR experience.
Rotation
Use the Rotation property to change the object’s orientation.
The rotation angle can be adjusted independently along the X, Y, Z axes according to the display requirements.
Scale
Use Scale to change the object’s size.
When adjusting the size, make sure the model’s scale is appropriate for the actual dimensions of the deployment space.
For 3D content, XenseAR requires models to use real-world scale and meters as the unit of measurement to ensure accurate placement in the AR environment.
During the editing process, regularly check the object’s position, size, and orientation to ensure that the content is appropriate for the real-world space.
To edit content that has already been added to the Project:
- Select the object to edit in the 3D space.
- Check the object’s information in the properties area.
- Modify the required parameters.
- Check the result directly in the 3D space.
- Click Save to save the changes.
7. Deleting Content
To delete content from a Project:
- Select the object to delete. It can be selected from the list or directly from the 3D Scene.
- Use the Delete function.
- Check the 3D space to make sure the object has been removed.
- Save the Project after completing the operation.
Note: Carefully verify the object before deleting it to avoid accidentally removing content that is currently being used in the experience.
8. 3D Content Management
To ensure performance when deploying AR on the Web, 3D content should be optimized before being added to the Project.
According to the current XenseAR content specifications:
| Category | Web AR |
|---|---|
| Preferred 3D format | .GLB |
| Supported formats | .GLB, .FBX, .OBJ |
| Texture size | < 1024 × 1024 |
| Triangle Count | < 100,000 |
| Total Build Size | < 1 GB |
For individual models, the technical documentation also recommends a size of approximately ≤ 3 MB, with a maximum limit of ≤ 5 MB. However, models and textures should still be optimized according to the actual requirements of each Project.
Recommendations:
- Prefer
.GLBfor 3D models. - Reduce unnecessary polygon counts.
- Limit the number of Materials used by a model.
- Optimize Texture size and resolution.
- Test models on actual devices before deployment.
- Avoid using unnecessarily large content.
Exceeding polygon or resource limits may reduce performance, especially on web browsers and mobile devices.
9. Saving Content
After completing content creation or editing:
- Review all content in the 3D space.
- Check the position, size, and orientation of the objects.
- Click Save to save the changes.
Note: When using Web Editor, it is recommended to Save frequently to minimize data loss in case of browser errors or connection issues.
10. Checking Content After Editing
After completing content placement, perform the following checks:
- Check the number of content items added.
- Check the position of each object in the 3D space.
- Check the model’s size and scale.
- Check the object’s display orientation.
- Check any effects or interactive components, if applicable.
- Save the Project.
- Test the experience on an actual device at the deployment location.
For AR experiences, testing on an actual device is necessary to evaluate content visibility, stability, and positioning accuracy in the real-world environment.
11. Common Issues
| Issue | Possible Cause | Solution |
|---|---|---|
| Content is not displayed | Asset has not been loaded or the format is unsupported | Check the format and Asset status |
| Model is displayed at the wrong size | Incorrect scale when creating or exporting the model | Check the Scale and Meter unit |
| Model is in the wrong position | Position is incorrect | Adjust X/Y/Z |
| Model is facing the wrong direction | Rotation is incorrect | Adjust Rotation |
| Content loads slowly | Asset size is too large | Optimize the model and Texture |
| Low performance | Too many polygons/Materials/Assets | Reduce complexity and optimize resources |
| Changes are not saved | Save was not performed or the connection is unstable | Check the connection and save again |