APP CLIP ON DEVICE
Guide Version 09/2026
1. Overview
Users can start an Xense AR experience by scanning a QR Code at the experience location without having to manually search for or install the application beforehand.
The user journey consists of two cases:
- First-time access: The QR Code opens the experience on the Web (Three.js). The system identifies the information from the QR Code, loads the corresponding configuration, and takes the user into the experience.
- From the second visit onward on supported devices: The QR Code can open the experience as an App Clip (lightweight application), providing faster access and allowing users to directly use the device’s AR capabilities.
General Flow
Scan QR → Identify Experience → Open Web on First Visit → Experience AR → Scan QR Again → Open App Clip → Grant Camera Permission → Scan Space → Confirm Position → Experience AR
2. First-Time Access – Experience on the Web
Step 1 – Scan the QR Code
Open the Camera or the QR Code scanning function on the device and point the camera at the QR Code at the experience location.
After the QR Code is recognized, select the notification/link displayed on the screen.
Users do not need to install the application before performing this step.
Step 2 – QR Code and Device Identification
After the user opens the link, the system automatically:
- Identifies the QR Code type.
- Reads the experience information contained in the QR Code.
- Identifies the device type. If the device has insufficient hardware capabilities, the system displays a notification indicating that AR is not supported.
- Retrieves the configuration for the corresponding experience.
- Generates an access URL for the experience.
Short QR Case
The QR Code contains a Short Code representing an experience configuration.
The system uses the Short Code to retrieve the corresponding configuration and determine the AR content to be opened.
Step 3 – Open the Web Experience
On iOS
Flow:
Scan QR → Open Link → Intermediary Web Page
On the intermediary Web page, the system displays the following card:
Xense AR
AR Player – Open in App Clip
Select Open.
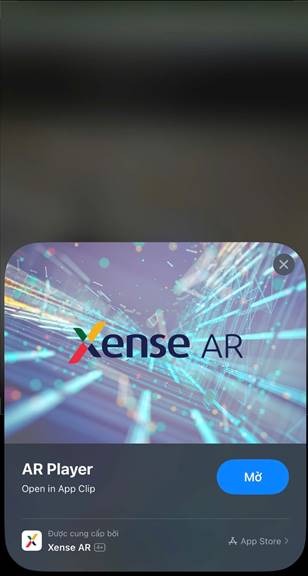
There is no need to download and install the full Xense AR application from the App Store.
On Android
When the user scans the QR Code on an Android device, if the corresponding module has been configured and supported, the system redirects directly to the corresponding experience application.
Step 4 – Grant Required Permissions
The first time the App Clip uses device functions, the system requests Camera permission and displays the notification:
“XenseAR” Would Like to Access the Camera
Select “Allow”.
The camera is used to scan the space, determine the user’s position, and display AR content.
If the experience requires additional permissions, the system requests them accordingly.
Step 5 – Scan and Recognize the Space
After Camera permission is granted, the App Clip displays:
“Scanning the space…”
The user should:
- Hold the phone relatively upright and steady.
- Move the device slowly so the camera can observe the environment.
- Point the camera toward areas with many recognizable features.
- Make sure the area has sufficient lighting.
The system uses camera data to localize the device within the Spatial Map.
Step 6 – Confirm Position
After successful localization, the screen displays:
“Your position has been confirmed”
The user is then taken to the corresponding AR content.
Complete Flow on iPhone
Scan QR → Intermediary Web Page → Open App Clip → Grant Camera Permission → Scan Space → Confirm Position → Experience AR
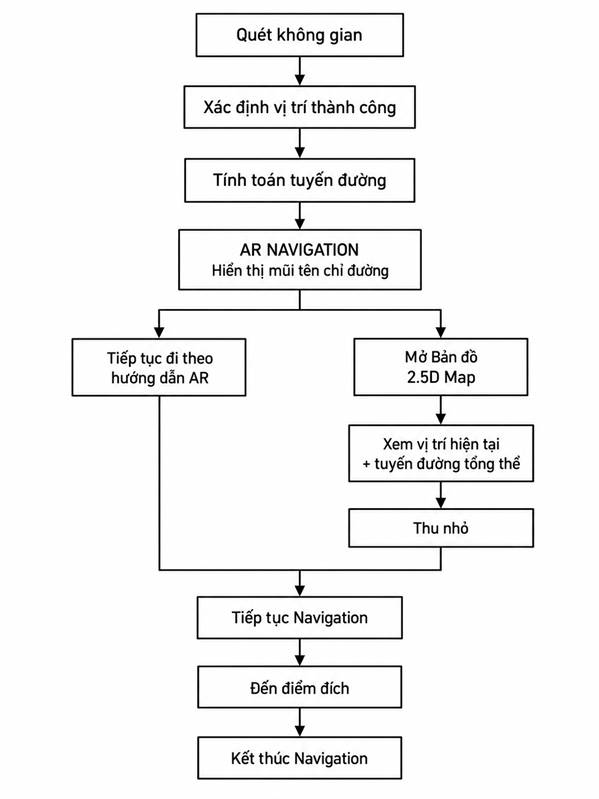
3. Navigation Experience Flow
Overall Flow
Open Destination List → Select Destination → Start → Scan Space → Position Successfully Determined → Start Navigation → Reach Destination
Step 1 – Select the Destination List on the Pre-Experience Screen
The system displays a list of locations available for navigation within the experience.
Depending on the experience configuration, the list may include:
- Location name.
- Area.
- Floor.
- Location type.
- Short description.
- Thumbnail image.
Users can scroll through the list or use the destination search function.
Step 2 – Select a Destination
From the destination list:
- Select the location you want to reach.
- The system displays the destination information.
- Review the selected destination.
- Select Start to begin the navigation process.
After selecting Start, the system must accurately determine the user’s current position before generating the route.
Step 3 – Scan the Space and Determine the Position
The system opens the Camera and switches to space-scanning mode.
After a successful scan, the system determines:
- The user’s current position.
- The device orientation.
- The selected destination.
- The appropriate route on the NavMesh.
The system then starts navigation using Navigation.
Step 4 – AR Navigation
The system displays 3D navigation arrows to guide the user.
The user should:
- Hold the phone facing forward.
- Follow the AR arrows.
- Move in the indicated direction.
- Continue following the route until reaching the destination.
The arrows are updated based on the user’s position and direction of movement.
Using the 2.5D Map During Navigation
Users can use the 2.5D Map while navigating by selecting “Map” in the upper-left corner of the screen.
The 2.5D Map supports the following operations:
- Zoom in/out on the 2.5D Map.
- Adjust the viewing angle.
- Display the current position.
- Display the route to follow.
4. Complete Experience Flow